Choosing among the best hydroponic systems for home can seem complicated at first, but a home hydroponic garden can actually be surprisingly simple. A small setup can keep basil and lettuce growing in the kitchen, while larger systems can support tomatoes, peppers, cucumbers, strawberries, and other productive crops indoors or in a greenhouse.
The tricky part is choosing the right system. Deep Water Culture is inexpensive and beginner-friendly, NFT works especially well for leafy greens, and Dutch buckets can handle much larger fruiting plants. Other methods, including Kratky, drip irrigation, ebb and flow, wick systems, and aeroponics, each have situations where they make more sense.
In this guide, we’ll compare the eight best hydroponic systems for home growers, including how they work, what they cost to maintain, which plants grow best in them, and their main advantages and drawbacks. Whether you want a few herbs on the counter or a larger year-round garden, this comparison will help you choose a system that fits your space, budget, and experience level.
Quick Comparison of the 8 Best Hydroponic Systems for Home
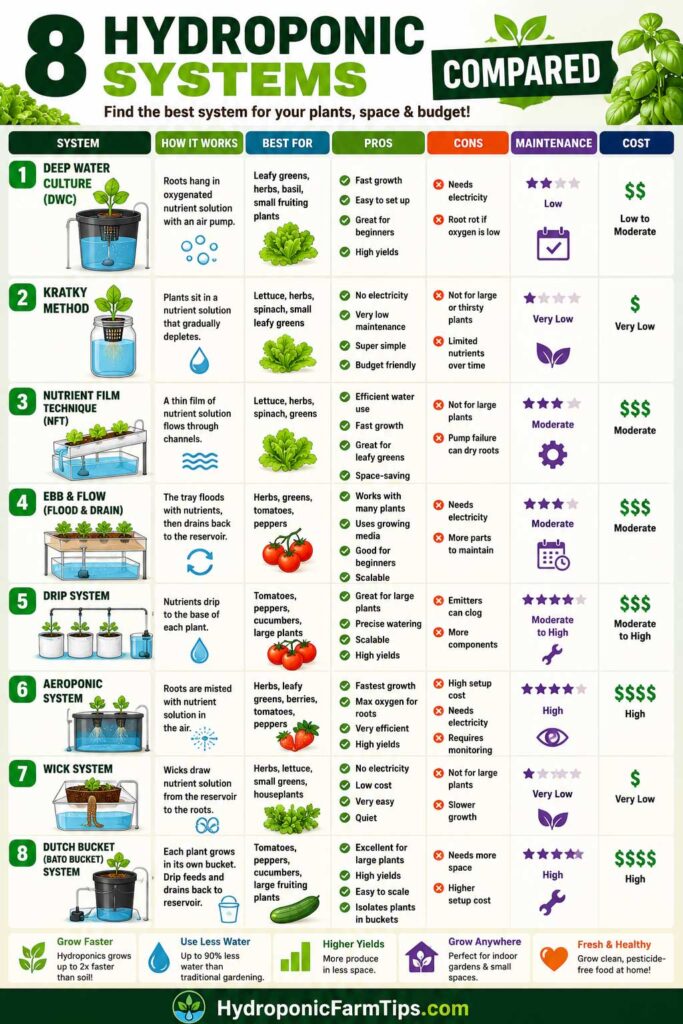
Before diving into each option, this comparison of the best hydroponic systems for home shows how they differ in difficulty, cost, maintenance, and the plants they handle best. There isn’t one hydroponic system that’s right for every home grower. A simple Kratky or DWC setup may be all you need for lettuce and herbs, while tomatoes, cucumbers, and other larger plants usually benefit from systems that provide more root space and support. Use the table below to narrow down your choices, then we’ll look at how each system works and where it performs best.
| Hydroponic System | Difficulty | Initial Cost | Maintenance | Best For | Ideal Plants |
|---|---|---|---|---|---|
| Deep Water Culture (DWC) | ⭐ Easy | $ | Low | Beginners | Lettuce, basil, spinach, kale |
| Kratky Method | ⭐ Very Easy | $ | Very Low | First-time growers | Lettuce, herbs, leafy greens |
| Nutrient Film Technique (NFT) | ⭐⭐⭐ Moderate | $$ | Medium | Fast-growing leafy crops | Lettuce, herbs, bok choy |
| Ebb and Flow (Flood and Drain) | ⭐⭐⭐ Moderate | $$ | Medium | Versatile home gardens | Herbs, peppers, tomatoes |
| Drip System | ⭐⭐⭐ Moderate | $$$ | Medium | Fruiting plants | Tomatoes, cucumbers, peppers |
| Aeroponics | ⭐⭐⭐⭐⭐ Advanced | $$$$ | High | Maximum growth rates | Leafy greens, herbs, strawberries |
| Wick System | ⭐ Easy | $ | Very Low | Small indoor gardens | Herbs, microgreens, lettuce |
| Dutch Bucket (Bato Bucket) | ⭐⭐⭐⭐ Advanced | $$$ | Medium | Large fruiting plants | Tomatoes, cucumbers, eggplants |
What Is a Hydroponic System?
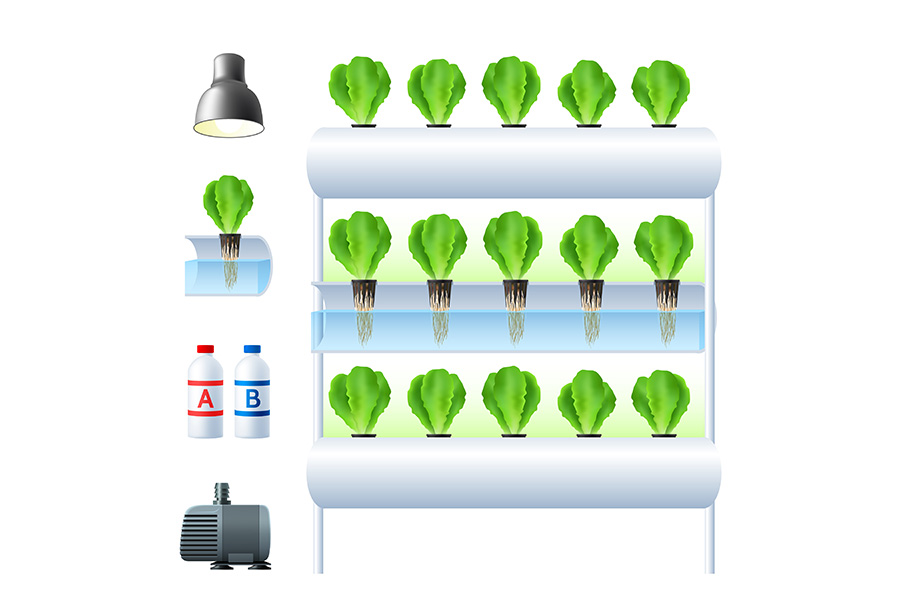
A hydroponic system is a method of growing plants without soil, with the roots receiving water and dissolved mineral nutrients from a nutrient solution. Depending on the system, the roots may sit directly in the solution, receive a shallow continuous flow, be watered at intervals, or even hang in the air and be misted.
Most home hydroponic setups use several basic components:
- Reservoir or container to hold the nutrient solution.
- Water and hydroponic nutrients to supply the mineral elements plants need.
- Growing medium or plant support, such as clay pebbles, rockwool, coco coir, or net pots.
- Root-zone oxygen, supplied by an air pump, flowing water, drainage cycles, or an air gap, depending on the system.
- Light, either natural sunlight or an appropriate grow light for indoor setups.
The biggest difference between hydroponic systems is how water, nutrients, and oxygen reach the roots. In Deep Water Culture, for example, roots remain in an aerated nutrient solution. NFT sends a shallow stream past the roots, while drip systems deliver nutrient solution directly to individual plants. Aeroponics takes a different approach by suspending the roots and spraying them with nutrient solution.
Which approach works best at home depends largely on:
- The space you have available.
- What you want to grow.
- Your starting budget.
- How much routine maintenance you want to do.
- Your experience with hydroponics.
A countertop lettuce garden and a greenhouse full of tomatoes have very different requirements, so choosing the right system from the beginning can save you money, maintenance, and frustration later.
It used to be hydroponics was just a nod, nod, wink, wink, word for pot growing. Now it is accepted by consumers as a preferred method of growing high-quality food.
Michael R. Christian, Founder of American Hydroponics
8 Best Hydroponic Systems for Home
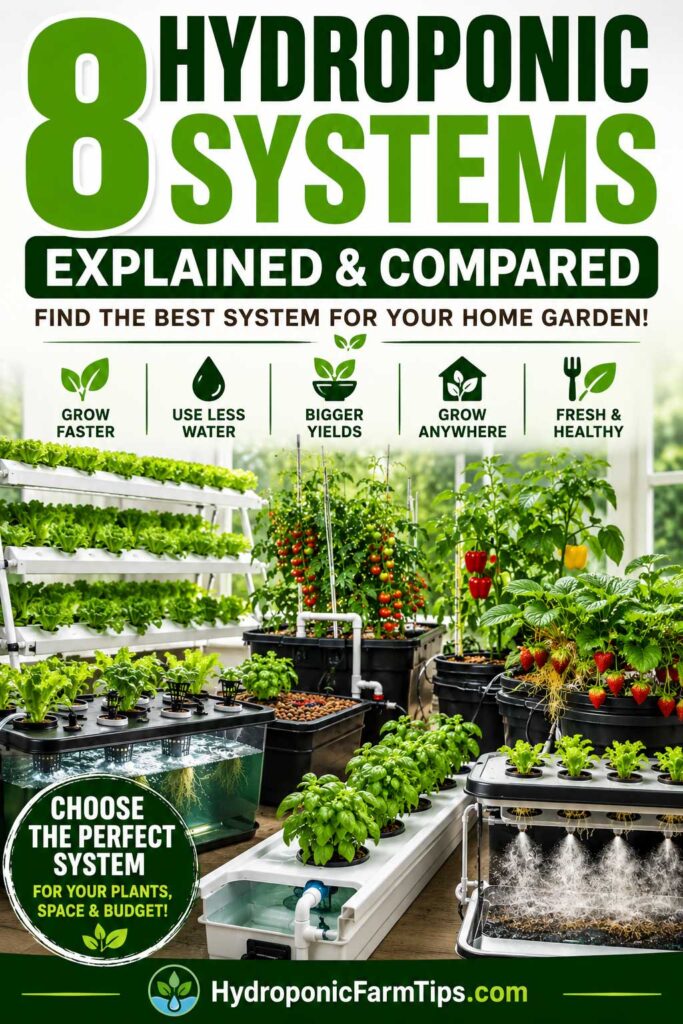
The best home hydroponic system depends on what you want to grow and how involved you want to be in managing it. Some methods, such as Kratky and Deep Water Culture, are inexpensive and relatively easy to learn. Others use pumps, timers, irrigation lines, or misting equipment to provide greater control but also require more attention.
The eight systems below cover options for everything from a few heads of lettuce on a countertop to tomatoes and cucumbers in a larger indoor garden or greenhouse. We’ll look at how each system works, its advantages and limitations, the crops it handles well, and the type of home grower it’s best suited for.
1. Deep Water Culture (DWC)
Best for beginners, leafy greens, and herbs
Deep Water Culture, usually shortened to DWC, is a straightforward way to start growing hydroponically at home. Plants sit in net pots above a reservoir while their roots extend directly into the nutrient solution. An air pump connected to an air stone keeps oxygen moving through the water.
The setup is relatively inexpensive, doesn’t require complicated plumbing, and gives the roots continuous access to water and nutrients. That combination works especially well for lettuce, basil, and other leafy crops.
| DWC at a Glance | Rating |
|---|---|
| Difficulty | Easy |
| Typical cost | $ |
| Maintenance | Low to moderate |
| Electricity required | Yes |
| Best for | Beginners, herbs, leafy greens |
| Main limitation | Dependence on aeration |
How Deep Water Culture Works
Plants are held in net pots so that their roots can grow down into the reservoir. The nutrient solution supplies water and dissolved mineral nutrients, while the air pump and air stone help maintain oxygen around the submerged roots.
Unlike an ebb-and-flow or drip system, DWC doesn’t repeatedly irrigate and drain the roots. Once established, much of the root mass remains in the aerated nutrient solution.
A basic home DWC system needs only a few components:
- A light-blocking reservoir or bucket.
- Net pots to support the plants.
- Hydroponic nutrients.
- An air pump, airline tubing, and air stone.
- A suitable growing medium for supporting seedlings.
- A pH testing method and, ideally, an EC/TDS meter.
This simplicity is a big reason DWC remains popular with new home growers.
DWC Advantages and Disadvantages
| Advantages | Disadvantages |
| Relatively simple to assemble | Depends on continuous aeration |
| Affordable compared with many active systems | Pump or power failure can stress roots |
| Excellent for leafy greens and many herbs | Reservoir conditions need monitoring |
| Few moving parts | Warm nutrient solution can contribute to root problems |
| Efficient use of water and nutrients | Large fruiting plants require more space and support |
| Easy to inspect the root system | Light entering the reservoir can encourage algae |
Best Plants for DWC
DWC is especially well suited to plants that grow quickly without becoming extremely large or top-heavy.
| Excellent Choices | Also Worth Trying |
| Lettuce | Swiss chard |
| Basil | Arugula |
| Spinach | Bok choy |
| Kale | Mint |
| Cilantro | Watercress |
Tomatoes, peppers, and cucumbers can also be grown in DWC, so I wouldn’t describe the system as unsuitable for them. They simply require a larger reservoir, stronger aeration, adequate lighting, and physical support as the plants mature.
Tips for Better DWC Results
Keep light out of the reservoir. Use an opaque container and cover unused openings. Light reaching the nutrient solution encourages algae growth.
Watch water temperature. Cooler nutrient solution generally holds more dissolved oxygen than warmer water. Rather than chasing one exact temperature, avoid allowing the reservoir to become excessively warm and follow the requirements of the crop you’re growing.
Don’t let the air pump stop unnoticed. Because established DWC roots depend heavily on oxygenation, check the pump and air stone regularly. A backup plan is useful if power outages are common in your area.
Monitor pH and nutrient strength. Plants remove water and nutrients at different rates, so reservoir conditions change as they grow. Check pH regularly and use EC or TDS readings when appropriate to help track nutrient concentration.
Keep equipment clean. Inspect the reservoir, tubing, air stone, and roots when performing routine maintenance. Cleaning between crops helps prevent algae, mineral deposits, and plant debris from building up.
Don’t automatically replace nutrient solution on a fixed calendar. Reservoir size, crop type, plant maturity, water quality, and nutrient management all affect how frequently a solution needs to be refreshed. Let the condition of the reservoir guide you instead of following a universal “every two weeks” rule.
Who Should Choose DWC?
DWC makes sense if you want an affordable first hydroponic system without complicated plumbing or irrigation lines. It’s particularly practical for a small indoor garden devoted to lettuce, basil, spinach, and similar crops.
If your goal is to grow several large tomato or cucumber plants, however, a Dutch bucket or drip system may give you more flexibility as the plants mature.
Best for: Beginners growing lettuce, herbs, and other leafy greens.
2. Kratky Method
Best non-electric hydroponic system
The Kratky Method is one of the simplest ways to grow plants hydroponically at home. It requires no air pump, water pump, timer, or circulating plumbing. Instead, a plant sits above a reservoir of nutrient solution, and its roots grow down into the water.
What makes Kratky different is what happens as the plant grows. The nutrient solution gradually drops as water is absorbed and lost through transpiration, leaving an expanding air space between the net pot and the solution. Upper roots occupy this humid air zone while lower roots continue reaching the nutrient solution.
| Kratky at a Glance | Rating |
|---|---|
| Difficulty | Very easy |
| Typical cost | $ |
| Maintenance | Very low |
| Electricity required | No |
| Best for | Leafy greens and herbs |
| Main limitation | Limited control as the crop grows |
How the Kratky Method Works
A basic Kratky setup needs surprisingly little equipment. The plant is supported in a net pot above an opaque container, with the young roots initially able to reach the nutrient solution.
As the plant consumes water, the solution level falls naturally. This is intentional. The resulting air space allows part of the established root system to remain exposed to moist air while the lower roots continue taking up water and dissolved nutrients.
A simple setup usually includes:
- An opaque container or reservoir.
- A lid with an opening for the plant.
- A net pot.
- A small amount of growing medium to support the seedling.
- Hydroponic nutrient solution.
- A way to monitor pH when needed.
Unlike DWC, there is no air stone continuously oxygenating the reservoir.
Kratky Advantages and Disadvantages
| Advantages | Disadvantages |
|---|---|
| No electricity required | Less control than active systems |
| No pumps or timers | Reservoir size limits available water and nutrients |
| Very inexpensive to start | Better suited to relatively small crops |
| Silent operation | Conditions can change during a long growing cycle |
| Few components that can fail | Not the easiest choice for large fruiting plants |
| Excellent for small spaces | Less convenient for some long-term crops |
| Beginner-friendly | Requires an appropriately sized reservoir |
Best Plants for the Kratky Method
Kratky works well for fast-growing crops that can complete much or all of their growth cycle using a reasonably sized reservoir.
| Excellent Choices | Also Worth Trying |
|---|---|
| Lettuce | Kale |
| Basil | Swiss chard |
| Bok choy | Arugula |
| Cilantro | Parsley |
| Spinach | Mint |
Lettuce is especially well suited to Kratky because it grows relatively quickly and doesn’t need the extensive root space or structural support required by large fruiting plants.
Tomatoes, peppers, and similar crops can be grown using modified or carefully managed Kratky setups, but their longer growing periods and greater water demands make them less convenient for beginners.
Tips for Better Kratky Results
Use an opaque reservoir. Light entering the nutrient solution encourages algae growth. If you’re using a transparent container, cover the outside so light cannot reach the reservoir.
Choose the reservoir size carefully. A tiny container may work for a small herb but can run short of water or nutrients before a larger plant reaches harvest. Match reservoir capacity to the crop and expected growing period.
Protect the developing air-root zone. Once the nutrient level has dropped and roots have adapted to the humid air space, don’t automatically fill the container back to its original level. Submerging those roots can reduce the oxygen available to them.
Monitor the plant rather than assuming “passive” means maintenance-free. Check the remaining solution, root condition, plant appearance, and pH periodically. Kratky eliminates pumps, but plants still need suitable nutrient and root-zone conditions.
Keep the reservoir reasonably cool. Excessively warm nutrient solution holds less dissolved oxygen and can create unfavorable root-zone conditions.
Start simple. Lettuce or basil in an appropriately sized container is a much easier first Kratky project than trying to support a mature tomato plant.
Who Should Choose the Kratky Method?
The Kratky Method makes sense if you want to experiment with hydroponics without buying pumps, timers, or complicated equipment. It’s particularly useful for a small indoor herb garden, countertop setup, classroom experiment, or a few heads of lettuce.
If you want continuous production, larger plants, or more control over the root environment, DWC, NFT, drip irrigation, or another active system may be a better long-term choice.
Best for: Beginners who want a simple, electricity-free setup.
3. Nutrient Film Technique (NFT)
Best hydroponic system for leafy greens
The Nutrient Film Technique (NFT) uses a shallow, continuously flowing stream of nutrient solution to feed plant roots inside slightly sloped growing channels. Unlike DWC, the roots aren’t submerged in a deep reservoir. Instead, only part of the root mass contacts the flowing solution, leaving much of it exposed to the humid, oxygen-rich space inside the channel.
NFT is widely associated with lettuce and herb production for good reason. It can fit many plants into a relatively small area, recirculates its nutrient solution, and works particularly well with fast-growing crops that have relatively compact root systems.
| NFT at a Glance | Rating |
|---|---|
| Difficulty | Moderate |
| Typical cost | $$ |
| Maintenance | Moderate |
| Electricity required | Yes |
| Best for | Lettuce, herbs, leafy greens |
| Main limitation | Plants depend on continuous nutrient flow |
How Nutrient Film Technique Works
Plants are positioned along growing channels installed at a slight slope. A pump moves nutrient solution from the reservoir to the higher end of each channel.
From there, gravity carries a shallow layer of solution past the roots and toward the lower end, where it drains back into the reservoir. The same solution is then pumped through the system again.
A typical home NFT system includes:
- A nutrient reservoir.
- A submersible water pump.
- Growing channels or gullies.
- Net pots or another method of supporting plants.
- Supply and return plumbing.
- Hydroponic nutrients.
- pH and EC monitoring equipment.
Getting the flow right matters. The goal isn’t to fill the channel with water but to maintain a shallow, reasonably even flow along its length.
NFT Advantages and Disadvantages
| Advantages | Disadvantages |
|---|---|
| Recirculates water and nutrients | Requires electricity and a reliable pump |
| Excellent for lettuce and herbs | Roots can dry quickly if circulation stops |
| Fits many plants into a compact area | Large root masses can interfere with flow |
| Roots have good access to oxygen | Channels need proper positioning and slope |
| Relatively little growing medium is needed | Pump and plumbing require maintenance |
| Easy to expand with additional channels | Less forgiving than DWC or Kratky |
| Well suited to repeated leafy-green harvests | Not the natural choice for large, heavy crops |
Best Plants for NFT
NFT works best with relatively lightweight plants that grow quickly and don’t develop enormous root systems.
| Excellent Choices | Also Worth Trying |
|---|---|
| Lettuce | Swiss chard |
| Basil | Cilantro |
| Bok choy | Mint |
| Arugula | Green onions |
| Many leafy greens | Some compact kale varieties |
Lettuce is one of the crops most closely associated with NFT. It’s lightweight, matures relatively quickly, and can be spaced efficiently along the channels.
Large tomatoes, cucumbers, melons, and similar fruiting crops present more challenges. Their weight requires substantial support, while their larger root systems can restrict flow through channels designed for leafy greens.
Tips for Better NFT Results
Get the channel slope right. NFT channels need enough slope for the nutrient solution to travel consistently from the inlet to the drain. Rather than treating one percentage as universally correct, follow the recommendations for your channel dimensions and system design, then confirm that every plant receives an even flow.
Check the pump every day. A DWC plant still has a reservoir surrounding its roots if an air pump stops temporarily. NFT offers much less of a buffer. If the water pump fails, exposed roots can begin drying relatively quickly, particularly in warm conditions.
Watch for root buildup. Healthy roots can eventually become large enough to alter water flow. Inspect the channels periodically for roots, debris, or mineral deposits that could cause water to back up or leave downstream plants short of solution.
Keep light out of the channels and reservoir. Openings that allow light to reach the nutrient solution can encourage algae. Cover unused planting holes and use opaque components where possible.
Monitor the reservoir. Because multiple plants share the same recirculating nutrient solution, changes in pH, nutrient concentration, temperature, and water level can affect the entire system.
Plan for pump interruptions. If NFT is your primary growing system and outages are common, consider how you’ll maintain circulation during an interruption. This becomes increasingly important as the plants mature.
Who Should Choose NFT?
NFT is worth considering if your main goal is growing lettuce, basil, and other leafy crops efficiently in a limited area. It works well for growers who want more planting sites than a basic bucket-based system can provide and don’t mind maintaining a pump and recirculating reservoir.
For a first experiment with hydroponics, DWC or Kratky is easier and more forgiving. But once you’re comfortable monitoring pH, nutrients, pumps, and roots, NFT can be an excellent step toward a larger and more productive home garden.
Best for: Lettuce, herbs, leafy greens, and compact high-output gardens.
4. Ebb and Flow (Flood and Drain)
Best all-around hydroponic system for versatility
An Ebb and Flow system, also called Flood and Drain, takes a different approach from DWC and NFT. Instead of keeping roots continuously in nutrient solution or maintaining a constant shallow flow, the system periodically floods the root zone and then allows the solution to drain back into a reservoir.
That wet-and-dry cycle is what makes Ebb and Flow so versatile. Plants receive water and dissolved nutrients during each flood, while drainage allows fresh air back into the spaces around the roots. The system also works with several growing media and can accommodate everything from herbs and leafy greens to larger fruiting plants.
| Ebb and Flow at a Glance | Rating |
|---|---|
| Difficulty | Moderate |
| Typical cost | $$ |
| Maintenance | Moderate |
| Electricity required | Yes |
| Best for | Mixed crops and versatile home gardens |
| Main limitation | Flood timing must match the setup and plants |
How Ebb and Flow Works
Plants are usually placed in individual containers or a larger grow tray containing a hydroponic growing medium. A reservoir sits below the growing area.
At scheduled intervals, a pump moves nutrient solution into the tray until the root zone reaches the intended flood level. When the pump switches off, gravity returns the solution to the reservoir through the drainage system.
A typical home Ebb and Flow setup includes:
- A grow tray or individual containers.
- A nutrient reservoir.
- A submersible water pump.
- A timer.
- Fill and drain fittings.
- A suitable growing medium.
- Hydroponic nutrients.
- pH and EC monitoring equipment.
The process repeats throughout the day, but there is no universal flood schedule. How often the system should run depends on the crop, plant size, growing medium, root development, temperature, humidity, and design of the system.
Ebb and Flow Advantages and Disadvantages
| Advantages | Disadvantages |
|---|---|
| Works with many different crops | More components than DWC or Kratky |
| Supports several growing media | Depends on a pump and timer |
| Roots receive fresh air as the tray drains | Poor flood timing can stress plants |
| Recirculates water and nutrients | Drainage problems can leave roots waterlogged |
| Can accommodate larger plants | Pump failure can interrupt irrigation |
| Easy to customize for different layouts | Plumbing and fittings require cleaning |
| Good option for mixed home gardens | Large setups need more space |
Best Plants for Ebb and Flow
One of this system’s biggest advantages is that you aren’t limited to a narrow group of plants.
| Excellent Choices | Also Worth Trying |
|---|---|
| Basil | Lettuce |
| Strawberries | Kale |
| Bell peppers | Spinach |
| Tomatoes | Beans |
| Eggplants | Some cucumber varieties |
Fruiting plants such as tomatoes and peppers benefit from the additional root space available in larger containers, although they still need appropriate lighting, nutrition, spacing, and physical support.
For very large tomatoes or cucumbers, a drip-fed Dutch bucket system may be more practical because each plant can have its own dedicated container.
Choosing a Growing Medium
The growing medium has a major influence on how an Ebb and Flow system behaves because different materials retain different amounts of water between flood cycles.
| Growing Medium | General Characteristics |
|---|---|
| Expanded clay pebbles | Excellent drainage and aeration; relatively low water retention |
| Coco coir | Holds considerably more moisture between irrigation cycles |
| Perlite | Lightweight with good drainage and aeration |
| Rockwool | Holds both moisture and air but requires appropriate irrigation management |
This is one reason copying someone else’s timer settings isn’t a good idea. A tray filled with clay pebbles may need a very different irrigation schedule from containers filled with a moisture-retentive medium.
Tips for Better Ebb and Flow Results
Set flood frequency for your plants and growing medium. Don’t automatically program the pump to run a certain number of times per day because another grower does. Watch how quickly your root zone dries between cycles and adjust accordingly.
Test the drainage before adding plants. The nutrient solution should return reliably to the reservoir after each cycle. Low spots, blocked drains, or incorrectly installed fittings can leave standing water around the roots.
Don’t flood higher than necessary. Set the maximum water level so the root zone and growing medium receive adequate moisture without unnecessarily submerging stems or crowns.
Keep the reservoir covered. Blocking light helps discourage algae while also reducing evaporation and contamination.
Inspect the pump and plumbing. Roots, plant debris, and mineral deposits can interfere with water movement. Periodically check the pump, fittings, tubing, and drain.
Monitor the nutrient solution. Because the same solution is reused, keep an eye on pH, nutrient concentration, water level, and the general condition of the reservoir rather than relying on a rigid testing schedule.
Who Should Choose Ebb and Flow?
Ebb and Flow is a good fit for home growers who want more crop flexibility than a typical NFT or small DWC setup provides. You can use the same basic system for herbs and leafy greens or configure larger containers for peppers, strawberries, and other fruiting plants.
It does require more setup and troubleshooting than Kratky or basic DWC, particularly when determining flood frequency. In return, you get a system that can adapt as your hydroponic garden becomes larger or more diverse.
Best for: Growers who want one system for several different crops.
See also
5. Drip Hydroponic System
Best hydroponic system for tomatoes, peppers, and larger plants
A drip hydroponic system delivers nutrient solution directly to each plant through small irrigation lines and emitters. Rather than flooding an entire growing tray, the system applies water and nutrients to the growing medium around individual root zones.
This makes drip irrigation particularly useful for larger fruiting crops. Tomatoes, peppers, cucumbers, and eggplants can each grow in their own container while sharing the same main reservoir and irrigation network. The plants have plenty of room for their roots, while growers can control how frequently nutrient solution is delivered.
| Drip System at a Glance | Rating |
|---|---|
| Difficulty | Moderate |
| Typical cost | $$–$$$ |
| Maintenance | Moderate |
| Electricity required | Yes |
| Best for | Tomatoes, peppers, cucumbers, larger plants |
| Main limitation | Emitters and irrigation lines require maintenance |
How a Drip Hydroponic System Works
A pump moves nutrient solution from a reservoir through a main irrigation line. Smaller tubes branch from that line and carry the solution to individual plants, where drip emitters release it into the growing medium.
From there, a drip system can operate in one of two ways:
| Type | What Happens to the Drainage? |
|---|---|
| Recirculating (recovery) | Excess nutrient solution drains back to the reservoir and is reused. |
| Drain-to-waste (non-recovery) | Excess solution drains away and is not returned to the reservoir. |
Recirculating systems conserve nutrient solution but require closer monitoring because drainage returning from the plants can gradually change the chemistry of the reservoir. Drain-to-waste systems avoid that recirculation but generate runoff that needs to be managed responsibly.
A typical home drip system includes:
- A nutrient reservoir.
- A water pump.
- Main irrigation tubing.
- Smaller feeder lines.
- Drip emitters or stakes.
- A timer or irrigation controller.
- Containers and growing medium.
- Drainage or return plumbing.
- Hydroponic nutrients and monitoring equipment.
Drip System Advantages and Disadvantages
| Advantages | Disadvantages |
|---|---|
| Excellent for larger fruiting crops | More components than basic systems |
| Delivers solution directly to individual plants | Emitters can clog |
| Works with several growing media | Requires a pump and irrigation controls |
| Easy to scale by adding containers | Uneven flow can affect individual plants |
| Gives large plants plenty of root space | Tubing and emitters need periodic cleaning |
| Recirculating designs can reuse drainage | Setup is more involved than DWC or Kratky |
| Works well with trellised crops | Irrigation timing needs adjustment as plants grow |
Best Plants for Drip Hydroponics
Drip systems really shine when plants need more root space and physical support than a typical NFT channel or small DWC container can provide.
| Excellent Choices | Also Worth Trying |
|---|---|
| Tomatoes | Strawberries |
| Bell peppers | Zucchini |
| Chili peppers | Melons |
| Cucumbers | Rosemary |
| Eggplants | Other larger herbs |
Tomatoes and cucumbers are particularly good candidates because each plant can have its own container while vines are supported independently with stakes, cages, or trellises.
I would remove blueberries from the main recommendation list. They can be grown in soilless/hydroponic-style systems, but their acidic root-zone requirements make them more specialized than the other crops here. They aren’t a good general recommendation in a beginner-focused comparison.
Choosing a Growing Medium for Drip Systems
Because drip irrigation delivers nutrient solution into a substrate, your choice of growing medium affects how often you’ll need to irrigate.
| Growing Medium | General Characteristics |
|---|---|
| Coco coir | Good moisture retention with useful root-zone aeration |
| Perlite | Excellent drainage and aeration |
| Coco-perlite mix | Balances moisture retention and drainage |
| Expanded clay pebbles | Fast draining with plenty of air space |
| Rockwool | Holds substantial moisture while maintaining air spaces when managed correctly |
A medium that drains quickly generally needs different irrigation management from one that retains more moisture, so there isn’t a single drip schedule that works for every setup.
Tips for Better Drip System Results
Use a filter. Small drip emitters can be vulnerable to debris and mineral deposits. Filtering the nutrient solution before it enters the irrigation lines can reduce clogging.
Check the emitters individually. A running pump doesn’t guarantee that every plant is receiving solution. Periodically watch each emitter during an irrigation cycle and look for weak or blocked lines.
Adjust irrigation as plants mature. A young tomato seedling and a mature fruiting tomato plant don’t have the same water demand. Temperature, humidity, growing medium, container size, and plant growth all influence irrigation needs.
Provide support early. Tomatoes, cucumbers, peppers, and other fruiting crops can become surprisingly heavy. Install trellises, stakes, cages, or support strings before the plants become difficult to manage.
Flush irrigation lines when needed. Fertilizer salts and deposits can accumulate inside tubing and emitters. Routine inspection and flushing help maintain consistent delivery throughout the system.
Pay attention to drainage. The growing medium should receive enough solution to wet the root zone without leaving roots sitting in stagnant water. Good drainage is just as important as irrigation.
Who Should Choose a Drip Hydroponic System?
A drip system becomes especially useful when your main goal is growing tomatoes, peppers, cucumbers, eggplants, or other larger fruiting crops. Individual containers provide substantially more flexibility for root development and plant support than narrow NFT channels.
It also makes sense for growers who expect to expand. You can begin with a handful of containers and add additional irrigation lines and growing sites as your garden develops.
The tradeoff is complexity. You’ll have more tubing, fittings, emitters, drainage, and irrigation timing to manage than with DWC or Kratky.
Best for: Tomatoes, peppers, cucumbers, and other larger fruiting crops.
6. Aeroponic System
Best advanced system for maximizing root-zone oxygen
An aeroponic system grows plants with their roots suspended inside an enclosed chamber rather than submerged in a reservoir or supported by a large volume of growing medium. The exposed roots are repeatedly sprayed or misted with nutrient solution, providing water and mineral nutrients while leaving much of the root surface surrounded by air.
That combination gives roots excellent access to oxygen and can support rapid, efficient plant growth when conditions are properly controlled. The tradeoff is that aeroponics leaves little room for equipment failure. If nutrient delivery stops, exposed roots can lose moisture much faster than roots growing in DWC or a moisture-retentive substrate.
| Aeroponics at a Glance | Rating |
|---|---|
| Difficulty | Advanced |
| Typical cost | $$$–$$$$ |
| Maintenance | High |
| Electricity required | Yes |
| Best for | Experienced growers, leafy greens, herbs, strawberries |
| Main limitation | Roots depend heavily on reliable spray or mist delivery |
How Aeroponics Works
Plants are supported above an enclosed root chamber, with their roots hanging freely inside. A pump delivers nutrient solution through sprayers or misting nozzles positioned around the roots.
The roots receive nutrient solution at controlled intervals, and excess liquid is typically collected and returned to the reservoir for reuse.
A home aeroponic system may include:
- An enclosed root chamber.
- Plant collars, net pots, or another support system.
- A nutrient reservoir.
- A water pump.
- Sprayers or misting nozzles.
- Tubing and fittings.
- A timer or irrigation controller.
- Hydroponic nutrients.
- pH and EC monitoring equipment.
Not every aeroponic system works the same way. Low-pressure aeroponics (LPA) generally uses simpler pumps and larger spray droplets, while high-pressure aeroponics (HPA) uses specialized equipment to produce a much finer mist.
For a home grower, that distinction matters because high-pressure systems tend to be more expensive and technically demanding.
Aeroponics Advantages and Disadvantages
| Advantages | Disadvantages |
|---|---|
| Excellent oxygen exposure around roots | More complicated than beginner systems |
| Uses little or no bulk growing medium | Pump failure can affect plants quickly |
| Recirculating designs can use water efficiently | Nozzles or sprayers can clog |
| Roots are easy to inspect | Requires reliable timers and pumps |
| Works well in compact and vertical designs | Higher initial equipment cost |
| Can support rapid growth under well-managed conditions | Requires frequent inspection |
| Precise control over root-zone irrigation is possible | Less forgiving of mistakes and outages |
Best Plants for Aeroponics
Aeroponics can support a surprisingly broad range of crops, but smaller, faster-growing plants are generally easier to manage in a home system.
| Excellent Choices | More Advanced Choices |
|---|---|
| Lettuce | Tomatoes |
| Basil | Peppers |
| Leafy greens | Cucumbers |
| Many culinary herbs | Larger fruiting crops |
| Strawberries | Specialty crops |
Lettuce, basil, and other leafy crops are easier to manage because they’re relatively lightweight and have shorter production cycles.
Strawberries can also work well in aeroponic systems, especially where space efficiency is important.
Tomatoes, peppers, and cucumbers are possible, but they add another layer of complexity. Their larger root systems, longer growing periods, nutrient demands, and heavy above-ground growth require more space and substantial plant support.
Low-Pressure vs. High-Pressure Aeroponics
| Low-Pressure Aeroponics | High-Pressure Aeroponics |
|---|---|
| Uses relatively simple pumps | Requires higher-pressure equipment |
| Produces larger droplets or spray | Produces a much finer mist |
| Easier for DIY home systems | More technically demanding |
| Generally less expensive | Generally more expensive |
| Easier to maintain | Nozzle performance becomes especially important |
For most people experimenting with aeroponics at home, a simpler low-pressure design is easier to build and troubleshoot than jumping immediately into a sophisticated high-pressure system.
Tips for Better Aeroponic Results
Make reliability a priority. In aeroponics, exposed roots don’t have a large reservoir or moisture-holding substrate to fall back on. Regularly inspect the pump, timer, tubing, sprayers, and electrical connections.
Check every sprayer or nozzle. A partially clogged emitter can leave part of the root system inadequately supplied even though the pump appears to be working normally.
Keep light out of the root chamber. Roots should remain in a dark environment. Blocking light also helps discourage algae inside the chamber.
Keep the system clean. Small openings are particularly vulnerable to mineral deposits and debris. Inspect and clean components according to the design of your system and the nutrient products you use.
Consider your water quality. Water with a high mineral content can contribute to deposits in pumps, tubing, and small nozzles. Filtration or other water treatment may be useful depending on your source water and equipment.
Monitor pH and nutrient concentration. A relatively small recirculating reservoir can change as plants consume water and nutrients, so monitor conditions rather than assuming the original nutrient mix will remain stable.
Have a plan for outages. If you’re investing in a more advanced aeroponic garden, consider what will happen to the roots if a pump, timer, or electrical circuit fails.
Who Should Choose Aeroponics?
Aeroponics is most appealing to growers who already understand the basics of pH, nutrient management, pumps, irrigation timing, and root health and want greater control over the root environment.
It’s also useful when space is limited because aeroponic technology can be incorporated into compact and vertical growing systems.
For a first hydroponic garden, however, DWC or Kratky is usually easier, cheaper, and more forgiving. Aeroponics becomes more attractive once you’re comfortable troubleshooting equipment and monitoring plants closely.
Best for: Experienced growers who want greater control over the root zone.
7. Wick System
Best simple passive hydroponic system
A wick system is about as simple as hydroponics gets. It doesn’t need a water pump, air pump, timer, or circulating plumbing. Instead, one or more absorbent wicks carry nutrient solution from a reservoir into the growing medium through capillary action.
That simplicity makes wick systems inexpensive, quiet, and easy to experiment with at home. Their main limitation is also straightforward: a wick can move only so much solution. Small herbs and leafy plants may do well, while thirsty, fast-growing crops can demand water and nutrients faster than the system can deliver them.
| Wick System at a Glance | Rating |
|---|---|
| Difficulty | Very easy |
| Typical cost | $ |
| Maintenance | Very low |
| Electricity required | No |
| Best for | Small herbs and lightweight crops |
| Main limitation | Limited water and nutrient delivery |
How a Wick System Works
The growing container sits above a reservoir filled with nutrient solution. One end of each wick remains in the reservoir while the other reaches into the growing medium.
The wick absorbs solution and carries it upward. From there, moisture spreads through the growing medium and becomes available to the roots.
A basic wick system needs only:
- A nutrient reservoir.
- A growing container.
- One or more absorbent wicks.
- A suitable growing medium.
- Hydroponic nutrients.
- A plant or seedling.
There are no pumps to program and no irrigation cycles to schedule.
Wick System Advantages and Disadvantages
| Advantages | Disadvantages |
|---|---|
| No electricity required | Limited irrigation capacity |
| No pumps or timers | Poor choice for large, thirsty plants |
| Very inexpensive to build | Wick performance can vary |
| Quiet operation | Growing medium can become too wet |
| Few mechanical failure points | Nutrient salts can accumulate |
| Easy to understand and troubleshoot | Less control over root-zone moisture |
| Good for small spaces and experiments | Difficult to scale for larger crops |
Best Plants for a Wick System
Wick systems are most practical for relatively small plants that don’t have enormous water demands.
| Good Choices | Possible With Care |
|---|---|
| Basil | Small lettuce varieties |
| Parsley | Spinach |
| Cilantro | Mint |
| Chives | Other compact herbs |
| Small leafy greens | Small ornamental plants |
Mint can grow aggressively and use substantial amounts of water as it matures, so give it enough reservoir capacity rather than assuming every herb has the same requirements.
I would leave succulents off this list. Although you can experiment with many plants in soilless setups, a system designed to continuously wick moisture toward the root zone isn’t an obvious match for plants adapted to drying between waterings.
Choosing a Growing Medium
The growing medium is especially important in a wick system because it must help move and distribute moisture while still allowing air around the roots.
| Growing Medium | General Characteristics |
|---|---|
| Coco coir | Good capillary action and moisture retention |
| Perlite | Improves drainage and root-zone aeration |
| Coco-perlite mix | Useful balance of moisture retention and air space |
| Vermiculite | Holds considerable moisture; often better as part of a blend |
A medium that stays too wet can reduce root-zone aeration, while one that doesn’t wick effectively may leave portions of the root system too dry.
Tips for Better Wick System Results
Match the wick to the container. The material, thickness, length, and number of wicks all affect how quickly nutrient solution reaches the growing medium. A setup that works for one small herb may not supply enough moisture for several larger plants.
Don’t assume cotton is always the best choice. Natural fibers can wick effectively but may degrade over time. Synthetic materials such as nylon or polyester can also work and may last longer.
Check the growing medium, not just the reservoir. A full reservoir doesn’t guarantee that moisture is reaching the roots correctly. Occasionally inspect the medium to make sure it isn’t excessively wet or unexpectedly dry.
Keep light out of the reservoir. An opaque container helps limit algae growth and keeps the nutrient solution cleaner.
Watch for nutrient buildup. Because there isn’t a strong flow of solution through the root zone, dissolved salts can accumulate in the growing medium over time. Monitor plant health and manage the medium appropriately if buildup develops.
Keep the system small. Wick hydroponics works best when you take advantage of its simplicity rather than trying to make it perform like a pumped irrigation system.
Wick System vs. Kratky: What’s the Difference?
These two beginner-friendly systems are sometimes confused because neither requires electricity.
| Wick System | Kratky Method |
|---|---|
| Wicks move solution to the growing medium | Roots extend directly into the nutrient solution |
| Relies heavily on capillary action | Develops an air gap as solution level falls |
| Plants generally grow in more substrate | Usually uses relatively little growing medium |
| Good for small herbs and compact plants | Particularly well suited to lettuce and leafy greens |
| Water level can be maintained in the reservoir | Original Kratky approach relies on a declining solution level |
If your main goal is growing lettuce, I’d generally favor Kratky over a wick system. If you want a tiny, inexpensive herb setup and like the idea of keeping the roots in a growing medium, a wick system is the simpler option.
Who Should Choose a Wick System?
Choose a wick system if you want to learn the basic principles of hydroponics with almost no equipment and no electricity. It’s useful for small herb gardens, classroom projects, countertop experiments, and growers who value simplicity more than maximum production.
For larger plants or a garden you intend to expand significantly, DWC, Ebb and Flow, drip irrigation, or another active system will usually give you much more control.
Best for: Small herbs, educational projects, and ultra-simple indoor gardens.
8. Dutch Bucket (Bato Bucket) System
Best hydroponic system for large fruiting plants
A Dutch Bucket system, also called a Bato Bucket system, combines individual growing containers with drip irrigation. Each plant gets its own bucket and growing medium, giving the roots considerably more room than they would have in a narrow NFT channel or small net pot.
That makes Dutch buckets particularly useful for tomatoes, cucumbers, peppers, and other large fruiting plants. The buckets are connected to a common irrigation and drainage system, so several sizable plants can be managed from one nutrient reservoir.
| Dutch Bucket at a Glance | Rating |
|---|---|
| Difficulty | Moderate to advanced |
| Typical cost | $$$ |
| Maintenance | Moderate |
| Electricity required | Yes |
| Best for | Tomatoes, cucumbers, peppers |
| Main limitation | Requires more space, plumbing, and plant support |
How a Dutch Bucket System Works
Plants grow individually in buckets filled with a relatively well-draining growing medium. A pump sends nutrient solution from the reservoir through irrigation tubing to drip emitters positioned at each bucket.
The solution moves through the root zone, and excess liquid drains from the bucket. In a recirculating setup, that drainage enters a return line and flows back to the main reservoir for reuse.
A typical home Dutch Bucket system includes:
- Individual Dutch or Bato buckets.
- A nutrient reservoir.
- A water pump.
- Main irrigation tubing.
- Drip lines and emitters.
- Drain fittings and a return line.
- Growing medium.
- A timer or irrigation controller.
- Trellises, stakes, or another support system.
- Hydroponic nutrients and monitoring equipment.
The system can start with only a few buckets and expand by adding additional growing sites, provided the reservoir, pump, irrigation lines, and drainage system are sized appropriately.
Dutch Bucket Advantages and Disadvantages
| Advantages | Disadvantages |
|---|---|
| Excellent root space for large plants | Requires more room than compact systems |
| Well suited to tomatoes and cucumbers | More plumbing and components to maintain |
| Individual plants are easy to access | Drip emitters can clog |
| Easy to add or remove buckets | Requires a pump and irrigation controls |
| Works with several growing media | Large plants need substantial physical support |
| Recirculating designs reuse nutrient solution | Reservoir conditions affect the entire system |
| Scales well for greenhouse growing | Setup costs more than Kratky or basic DWC |
One important distinction: separate buckets don’t completely isolate the plants. If several buckets drain into the same recirculating reservoir, they still share nutrient solution. A root-zone pathogen introduced into one part of the system may therefore have a pathway to other plants.
Best Plants for Dutch Buckets
Dutch buckets are at their best when used for crops that become too large or root-heavy for smaller hydroponic systems.
| Excellent Choices | Possible With More Planning |
|---|---|
| Tomatoes | Squash |
| Cucumbers | Melons |
| Bell peppers | Other large fruiting crops |
| Chili peppers | Specialty crops |
| Eggplants | Acid-loving crops such as blueberries* |
Tomatoes and cucumbers are two of the strongest reasons to choose this system. Each plant gets its own root space while the above-ground growth can be trained vertically using strings, stakes, cages, or trellises.
*Blueberries can be grown in soilless container systems, but they have specialized root-zone and pH requirements. I wouldn’t recommend them as a first Dutch Bucket crop.
I would also remove dwarf fruit trees from the general list. Containerized soilless production of woody fruit crops is possible, but it is substantially more specialized than the vegetable production most home growers associate with Dutch buckets.
Choosing a Growing Medium
Dutch buckets need a medium that provides root support while allowing nutrient solution to move through the container without leaving the root zone waterlogged.
| Growing Medium | General Characteristics |
|---|---|
| Perlite | Lightweight, highly aerated, and fast draining |
| Coco coir | Retains considerably more moisture |
| Coco-perlite mix | Balances moisture retention with drainage |
| Expanded clay pebbles | Excellent drainage and reusable when properly cleaned |
The growing medium affects irrigation frequency. A bucket filled primarily with perlite behaves differently from one containing moisture-retentive coco coir, so irrigation timing should be adjusted to the actual setup.
Dutch Bucket vs. Regular Drip System
These systems are closely related because Dutch buckets normally use drip irrigation. The main distinction is the growing-container arrangement.
| Drip System | Dutch Bucket System |
|---|---|
| Describes the irrigation method | Describes a specific container-based growing system |
| Can irrigate many types of containers or beds | Uses individual connected buckets |
| Suitable for small or large plants | Particularly useful for larger fruiting plants |
| Drainage design varies widely | Commonly incorporates organized drainage/return plumbing |
In other words, a Dutch Bucket setup is generally a type of drip-fed hydroponic system, rather than a completely unrelated method.
Tips for Better Dutch Bucket Results
Install plant supports early. Don’t wait until a tomato or cucumber is already sprawling across the greenhouse. Set up strings, trellises, stakes, or cages while the plants are still manageable.
Check every emitter. A single clogged drip line can deprive one plant of water and nutrients even while the rest of the system appears to be operating normally.
Pay attention to drainage. Each bucket needs to drain reliably. Inspect return lines for roots, debris, or mineral buildup that could interfere with flow.
Size the reservoir for mature plants. Several large fruiting plants can consume far more water than young seedlings. Plan for their mature demand rather than sizing the system around newly transplanted plants.
Adjust irrigation as plants grow. Water demand changes with plant size, temperature, humidity, fruit production, and growing medium. Don’t assume one timer setting will remain ideal throughout the entire crop cycle.
Monitor a recirculating reservoir carefully. Because drainage returns to the same reservoir, keep track of pH, nutrient concentration, water level, temperature, and overall root health.
Who Should Choose a Dutch Bucket System?
A Dutch Bucket system is one of the strongest home hydroponic choices if your main goal is growing tomatoes, cucumbers, peppers, or eggplants rather than primarily lettuce and herbs.
It requires more room and equipment than DWC, Kratky, or NFT, but the individual containers provide the root space and flexibility that large fruiting plants need. It also scales naturally: once the irrigation and return lines are established, additional buckets can often be incorporated into the system.
If you’ve been growing lettuce and herbs and now want to tackle tomatoes or cucumbers, Dutch buckets are a natural next step.
Best for: Tomatoes, cucumbers, peppers, and other large greenhouse crops.
How to Choose the Best Hydroponic System for Your Home
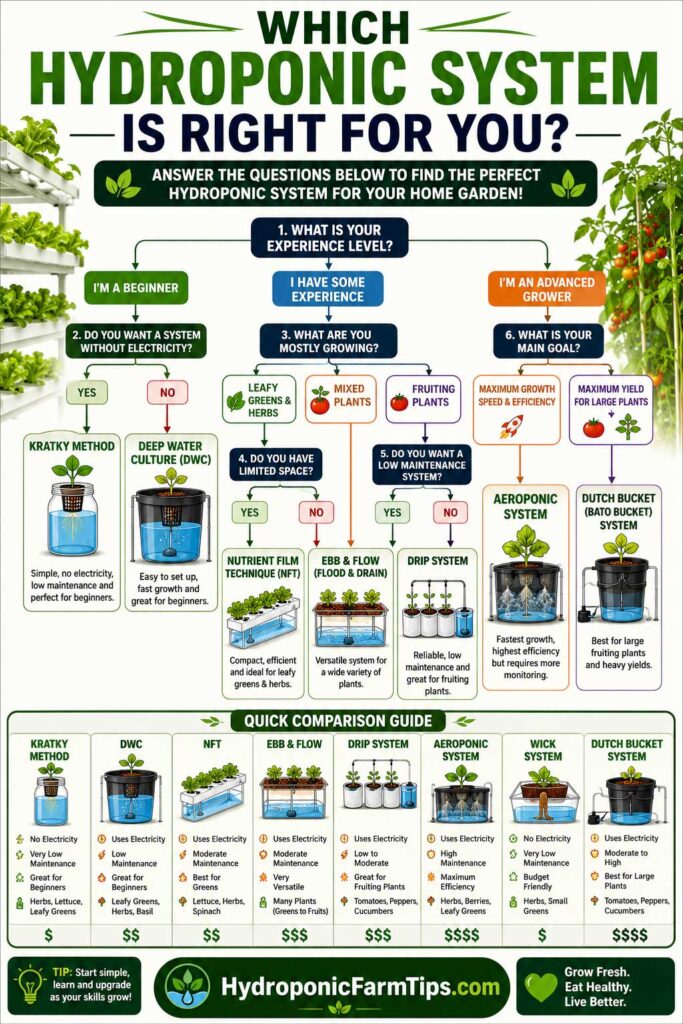
There isn’t a single hydroponic system that’s best for every home garden. A simple Kratky container may be perfect for someone growing a few heads of lettuce, while a greenhouse full of tomatoes calls for a completely different setup.
Before buying equipment, think about what you want to grow, how much space you have, your budget, and how much time you’re willing to spend maintaining the system. These five factors will narrow the choices considerably.
1. Start With Your Experience Level
Hydroponics becomes easier once you’re comfortable checking nutrient solution, recognizing root problems, adjusting pH, and troubleshooting pumps or irrigation equipment. Your first system doesn’t need to be the most sophisticated one.
| Experience Level | Good Systems to Consider | Why |
|---|---|---|
| Complete beginner | Kratky, Wick | Very few components and no pumps |
| Beginner | DWC | Simple design with active aeration |
| Intermediate | NFT, Ebb and Flow | Introduces pumps, circulation, and irrigation management |
| Intermediate | Drip, Dutch Bucket | More plumbing and crop management |
| Advanced | Aeroponics | Highly dependent on reliable equipment and precise irrigation |
If this is your first hydroponic garden, DWC or Kratky will usually teach you more than an expensive automated system while being easier to troubleshoot when something goes wrong.
2. Choose the System Around What You Want to Grow
This is arguably the most important consideration. Don’t choose a system first and then try to force your preferred crop into it.
A lettuce plant and a mature tomato have very different requirements for root space, irrigation, lighting, and physical support.
| What You Want to Grow | Systems to Consider |
|---|---|
| Lettuce | DWC, NFT, Kratky |
| Basil and culinary herbs | DWC, NFT, Kratky, Wick |
| Spinach and leafy greens | DWC, NFT, Kratky |
| Tomatoes | Dutch Bucket, Drip, Ebb and Flow |
| Cucumbers | Dutch Bucket, Drip |
| Bell and chili peppers | Dutch Bucket, Drip, Ebb and Flow |
| Eggplants | Dutch Bucket, Drip |
| Strawberries | Drip, Ebb and Flow, Aeroponics |
| Mixed small crops | Ebb and Flow, DWC |
| Large fruiting crops | Dutch Bucket, Drip |
For a home garden focused primarily on lettuce and herbs, there’s little reason to start with a complicated Dutch Bucket setup. If tomatoes and cucumbers are your priority, however, the additional root space and support available with buckets or other drip-fed containers become much more valuable.
3. Match the System to Your Available Space
Hydroponics can work in surprisingly small areas, but the amount and shape of your available space will influence which system makes sense.
| Growing Area | Systems That Fit Well |
|---|---|
| Countertop | Kratky, Wick, compact DWC |
| Small apartment | Kratky, DWC, compact NFT |
| Grow tent | DWC, Ebb and Flow, Drip |
| Spare room or basement | NFT, DWC, Ebb and Flow, Drip |
| Garage | DWC, Ebb and Flow, Drip, Dutch Bucket |
| Greenhouse | Dutch Bucket, Drip, NFT, Ebb and Flow |
| Vertical growing area | NFT or suitable aeroponic designs |
Don’t look only at the footprint of the equipment. Think about the mature size of the plants as well.
A row of young tomato seedlings may occupy very little room when you install the system, but mature plants need vertical clearance, airflow, trellising, and enough space for you to reach them for pruning and harvesting.
4. Consider the Full Cost, Not Just the System
Hydroponic systems range from extremely inexpensive DIY containers to sophisticated automated gardens. Because prices vary by size, brand, location, and how much you build yourself, rigid price categories can become misleading.
A better approach is to compare the relative investment required.
| System | Relative Startup Cost | Common Additional Equipment |
|---|---|---|
| Kratky | $ | Container, net pot, nutrients |
| Wick | $ | Reservoir, wicks, growing medium |
| DWC | $–$$ | Air pump, air stone, reservoir |
| NFT | $$ | Channels, pump, reservoir, plumbing |
| Ebb and Flow | $$ | Grow tray, pump, timer, fittings |
| Drip | $$–$$$ | Pump, tubing, emitters, containers |
| Dutch Bucket | $$$ | Buckets, irrigation, return plumbing, supports |
| Aeroponics | $$$–$$$$ | Pump, sprayers/nozzles, controller, root chamber |
The growing system itself isn’t the entire budget. Depending on your setup, you may also need hydroponic nutrients, pH testing supplies, an EC/TDS meter, growing media, replacement pumps or emitters, timers, plant supports, and grow lights.
Indoor lighting can be one of the largest expenses, particularly when growing tomatoes, peppers, cucumbers, or other high-light crops.
5. Decide How Much Maintenance You Want
“No soil” doesn’t mean “no maintenance.” Every hydroponic garden needs some attention, but certain systems have far more equipment and potential failure points than others.
| System | Maintenance Level | What You’ll Mainly Monitor |
|---|---|---|
| Kratky | Very low | Solution level, roots, plant health |
| Wick | Very low | Reservoir, wicks, growing medium |
| DWC | Low–moderate | Aeration, reservoir, pH, nutrients |
| NFT | Moderate | Pump, flow, roots, reservoir |
| Ebb and Flow | Moderate | Pump, timer, drainage, flood cycles |
| Drip | Moderate | Emitters, irrigation, drainage |
| Dutch Bucket | Moderate | Emitters, drainage, reservoir, plant support |
| Aeroponics | High | Pump, nozzles, timing, roots, reservoir |
The biggest distinction isn’t simply how often you’ll look at the garden—it’s how quickly a problem can affect the plants.
A Kratky container has no pump to fail. In contrast, an NFT or aeroponic system depends on equipment continually or repeatedly delivering moisture to exposed roots. That makes reliability and routine inspection much more important.
Quick Decision Guide
If you’re still undecided, start with the crop you want to grow and work backward.
| If Your Priority Is… | Start With… |
|---|---|
| Simplest possible setup | Kratky |
| Best first active system | DWC |
| Lettuce and leafy greens | DWC or NFT |
| No electricity | Kratky or Wick |
| A variety of crops | Ebb and Flow |
| Tomatoes and peppers | Dutch Bucket or Drip |
| Cucumbers | Dutch Bucket or Drip |
| Compact production of leafy greens | NFT |
| Advanced root-zone control | Aeroponics |
For most first-time home growers, I would narrow the decision to DWC vs. Kratky. Both are inexpensive enough to learn on without committing to a large installation. Once you know which crops you enjoy growing and how much maintenance you’re comfortable with, moving into NFT, drip irrigation, Dutch buckets, or another larger system becomes a much easier decision.
Our Top Recommendations
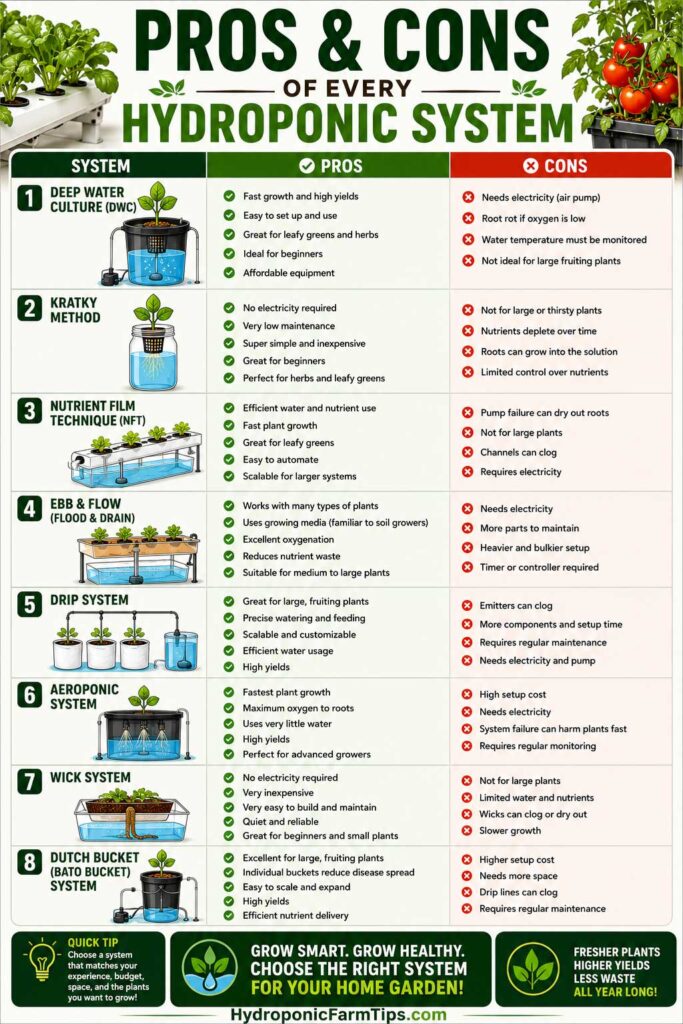
After comparing all eight systems, a few stand out for specific types of home growers. You don’t necessarily need the most advanced setup—the best choice is the one that matches your crops, available space, experience, and how much maintenance you want to handle.
| Category | Our Pick | Why We Like It |
|---|---|---|
| 🏆 Best Overall | Deep Water Culture (DWC) | The best balance of simplicity, cost, control, and growing performance for most new home growers. |
| 🌱 Best for Beginners | Kratky Method | No pumps, timers, or electricity required |
| 🥬 Best for Leafy Greens | Nutrient Film Technique (NFT) | Excellent for growing lettuce and herbs efficiently in limited space |
| 🍅 Best for Tomatoes & Peppers | Dutch Bucket System | Gives large fruiting plants plenty of root space and works well with trellising |
| ⚙️ Best Advanced System | Aeroponics | Provides excellent root-zone oxygen and precise control when properly managed |
| 💰 Best Budget Option | Wick System | Very inexpensive and requires almost no mechanical equipment |
| 🌿 Best for Versatility | Ebb and Flow | Accommodates different growing media and a wide range of crops |
| 🌶️ Best for Larger Fruiting Crops | Drip System | Delivers nutrient solution directly to individual tomatoes, peppers, cucumbers, and other larger plants |
Which One Would We Choose?
For someone building their first home hydroponic garden, we’d start with DWC or Kratky. Choose DWC if you don’t mind running an air pump and want an active system that’s easy to understand. Choose Kratky if simplicity, low cost, and growing without electricity matter most.
If your main goal is tomatoes, peppers, or cucumbers, skip the small beginner systems and consider a Dutch Bucket or drip system instead. For lettuce and herbs at a larger scale, NFT becomes a practical next step.
Aeroponics is worth considering once you have more experience, but most beginners don’t need the additional equipment and maintenance to grow healthy, productive plants at home.
Frequently Asked Questions About Best Hydroponic Systems for Home
What are the best hydroponic systems for home?
The best hydroponic systems for home depend on what you want to grow. DWC and Kratky are excellent starting points for beginners, while NFT works especially well for lettuce and herbs. For tomatoes, peppers, and cucumbers, drip irrigation or Dutch buckets usually provide more root space and plant support. Ebb and Flow offers more flexibility for mixed crops, while aeroponics is better suited to experienced growers.
What is the best hydroponic system for beginners?
Deep Water Culture (DWC) and the Kratky Method are two of the best places to start. DWC introduces you to pumps, aeration, pH, and nutrient management without complicated plumbing, while Kratky eliminates pumps and electricity altogether.
If you want to learn how an active hydroponic system works, choose DWC. If you want the simplest possible setup for lettuce or herbs, start with Kratky.
Which hydroponic system can grow plants the fastest?
There isn’t one hydroponic system that will always produce the fastest growth. Plant variety, lighting, temperature, nutrient management, root-zone oxygen, spacing, and overall growing conditions all influence growth rate.
Aeroponics can support rapid growth because the roots have excellent access to oxygen while receiving nutrient solution at controlled intervals. However, a well-managed DWC or NFT system can also produce fast-growing plants without the additional complexity of aeroponics.
What is the easiest hydroponic system to maintain?
The Kratky Method is among the easiest because it doesn’t require a pump, timer, or circulating irrigation system. An appropriately sized reservoir can support a short-cycle crop such as lettuce with relatively little intervention.
Passive doesn’t mean completely maintenance-free, though. You should still watch the plants, roots, nutrient solution, and reservoir conditions throughout the growing cycle.
Which hydroponic system is best for tomatoes?
Dutch Bucket and drip systems are two of the strongest choices for hydroponic tomatoes. Individual containers give tomato roots plenty of room while drip irrigation delivers nutrient solution directly to each plant.
Both systems also make it easier to install the stakes, strings, cages, or trellises mature tomato plants need for support.
Can I grow hydroponic plants indoors without sunlight?
Yes. Hydroponic plants can be grown entirely indoors using appropriate grow lights instead of direct sunlight.
Leafy greens and herbs are relatively practical indoor crops, while tomatoes, peppers, cucumbers, and other fruiting plants generally require considerably more light. When planning an indoor system, factor the grow light and its electricity use into your overall budget.
Do hydroponic systems use less water than soil gardening?
Hydroponic systems can use substantially less water, particularly when nutrient solution is captured and recirculated rather than allowed to drain away.
The exact savings depend on the hydroponic system and what it’s being compared with, so avoid assuming every setup will reduce water consumption by the same percentage. Recirculating DWC, NFT, Ebb and Flow, and similar systems can be especially efficient because water that isn’t taken up by the plants remains within the system for reuse.
Which hydroponic system is best for lettuce?
DWC, NFT, and Kratky are all excellent choices for lettuce.
For a few plants at home, Kratky or DWC is usually the simplest approach. NFT is a better fit when you want to grow many lettuce plants efficiently along a series of channels.
Can you grow tomatoes and lettuce in the same hydroponic system?
It’s possible, but it isn’t always practical. Tomatoes and lettuce differ considerably in mature size, growth period, lighting requirements, root space, and nutrient demand.
A mixed Ebb and Flow or drip setup can provide some flexibility, but home growers often find it easier to group plants with similar requirements rather than trying to optimize one reservoir and growing environment for very different crops.
Does a hydroponic system need electricity?
Not always. Kratky and wick systems can operate without electricity when adequate natural light is available.
DWC normally requires electricity for its air pump, while NFT, Ebb and Flow, drip, Dutch Bucket, and aeroponic systems depend on pumps or other powered equipment. Indoor gardens may also require electricity for grow lights, fans, and environmental controls.
How much does a home hydroponic system cost?
A small DIY Kratky or wick system can be built very inexpensively, while larger NFT, Dutch Bucket, drip, and aeroponic gardens can require a much greater investment.
Instead of budgeting only for the growing system, account for the complete setup. Depending on what you’re growing, that may include a reservoir, pumps, tubing, hydroponic nutrients, pH and EC testing equipment, growing media, timers, plant supports, replacement parts, and indoor grow lights.
Starting with a small system is often the smartest approach. You can learn how your plants respond before investing in a larger hydroponic garden.
Which Hydroponic System Is Best for Your Home?
The right hydroponic system doesn’t need to be the most expensive or technically advanced. It needs to fit what you want to grow, the space you have available, and how much time you want to spend managing it.
For a first home garden, Deep Water Culture (DWC) and the Kratky Method are hard to beat. Both keep the equipment relatively simple while giving you a practical introduction to growing without soil. If lettuce and herbs are your priority and you eventually want to expand production, NFT is a natural next step.
For tomatoes, peppers, cucumbers, and other larger fruiting plants, Dutch Buckets or drip irrigation provide more root space and make it easier to support mature plants. Ebb and Flow offers more flexibility when you want to experiment with several types of crops, while aeroponics is better suited to experienced growers who are comfortable managing pumps, sprayers, and a more failure-sensitive root zone.
Whichever system you choose, start small enough to learn how it behaves. Watch the roots, nutrient solution, pH, water level, equipment, and the way your plants respond. You’ll quickly learn what needs attention and what doesn’t.
Your first hydroponic setup doesn’t have to be your last. Start with the plants you want to grow now, complete a growing cycle, and expand once you know what you’d like to improve.
Keep Growing: More Hydroponic Guides
Once you’ve chosen a system, the next step is learning what to grow and how to keep your plants healthy. These guides explore some of the questions that come up as you move from choosing equipment to actually growing hydroponically at home:
- 7 Most Profitable Plants to Grow Hydroponically — Compare crops with strong yield and value potential and see which ones make sense for your available growing space.
- Are Hydroponic Vegetables Less Nutritious? — Take a closer look at how hydroponic and soil-grown vegetables compare and what actually influences their nutrient content.
- How to Replant Hydroponic Basil — Learn how to move hydroponically grown basil while minimizing damage to its delicate root system.
- Best Vegetables for Hydroponics — Compare vegetables that adapt particularly well to hydroponic growing and find good options for beginners.
- Hydroponic Nutrients Explained — Understand what plants need from a nutrient solution and how nutrient management changes as plants grow.
- Hydroponic pH Guide — Learn why pH matters in hydroponics, how to test it, and what to do when your nutrient solution moves outside the desired range.
- Common Hydroponic Problems and Solutions — Troubleshoot issues such as algae, unhealthy roots, yellowing leaves, and nutrient-related symptoms before they become bigger problems.