Moving a plant from water to soil can seem risky, especially when it has spent its entire life in a hydroponic system. But in many cases, you can transfer plants from hydroponics to soil successfully with a little preparation and careful handling.
The biggest adjustment happens below the surface. Hydroponic roots are accustomed to constant access to water, nutrients, and oxygen. Once they’re planted in soil, those roots have to adapt to a very different environment. Keeping them moist without waterlogging the soil and protecting outdoor transplants from unusually harsh conditions can make that transition much easier.
Below, we’ll go through the entire process—from choosing a plant that’s ready to move to preparing the soil, handling the roots, and caring for the plant afterward. We’ll also cover which hydroponic plants handle the move best, how to recognize transplant shock, and the common mistakes that can cause an otherwise healthy plant to struggle.
Can You Transfer Hydroponic Plants to Soil?
Yes. Many hydroponic plants can be transferred to soil successfully, especially when they’re young, healthy, and actively growing. The main challenge is helping the roots adjust from a consistently moist hydroponic environment to soil without letting them dry out or keeping the new soil waterlogged.
Why You Might Move Hydroponic Plants to Soil
There are several practical reasons to move a hydroponic plant into soil. You may have started seedlings indoors for an early start, your plants may be getting too large for the system, or you may simply want to move them into outdoor beds or containers.
Move Plants Outdoors
Hydroponics can be a convenient way to start vegetables and herbs indoors before outdoor conditions are suitable. Once the weather warms, plants such as tomatoes, peppers, basil, and other herbs can be moved into garden beds, raised beds, or outdoor containers where they have more room to grow.
Free Up Space in Your Hydroponic System
Large plants can quickly crowd a small hydroponic garden. Tomatoes, peppers, cucumbers, and strawberries may eventually need more root space or physical support than the system can provide.
Moving them to soil frees those growing sites for new seedlings or smaller crops.
If space is becoming a recurring problem, it may also be worth comparing the Best Hydroponic Systems for Home to find a setup better suited to the crops you want to grow.
Get a Head Start on the Growing Season
Starting plants hydroponically indoors lets them begin growing while outdoor conditions are still unsuitable. Once the weather is right, you can move established plants into the garden instead of starting from seed outdoors.
Just remember that indoor-grown plants should be hardened off before moving outdoors permanently.
Reduce Hydroponic Maintenance
A hydroponic system requires you to manage the nutrient solution, pH, water level, pumps, and other equipment. Once established in a garden bed or container, a plant no longer depends on that system.
This can be useful when you want to simplify your setup or make room for another crop.
Move Plants Into Indoor Pots
You can also move hydroponic plants to soil without taking them outdoors. Herbs and many houseplants can be transferred into pots when you want to remove them from the hydroponic system or place them elsewhere in your home.
Whatever the reason for making the switch, timing matters. A young, healthy plant with vigorous roots will usually handle the transition better than an older plant that is already stressed, heavily fruiting, or tangled in the hydroponic system.
Best Plants to Transfer from Hydroponics to Soil
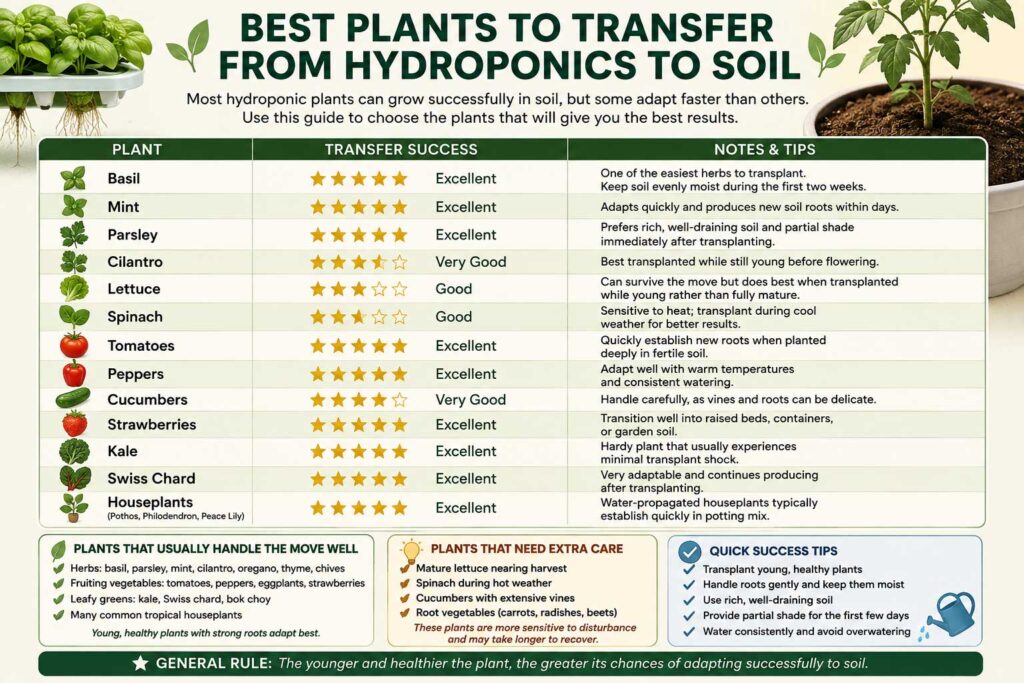
Many hydroponically grown plants can be moved to soil, but some handle the change more easily than others. Age matters too. A young basil or tomato plant with a manageable root system is generally much easier to transplant than a mature plant with tangled roots, flowers, or developing fruit.
If you’re deciding what to grow next, our guide to the Best Hydroponic Vegetables covers popular crops that perform well in hydroponic systems.
Here’s a practical comparison of common hydroponic plants and what to watch for when moving them to soil.
| Plant | Transfer Success | What to Know |
|---|---|---|
| Basil | ⭐⭐⭐⭐⭐ Excellent | Usually handles transplanting well. Keep the soil evenly moist while the roots adjust. |
| Mint | ⭐⭐⭐⭐⭐ Excellent | A vigorous grower that generally adapts readily to containers or garden soil. |
| Parsley | ⭐⭐⭐⭐☆ Good | Move younger plants carefully and avoid unnecessary root disturbance. |
| Cilantro | ⭐⭐⭐☆☆ Fair to Good | Transplant while young; cilantro develops a taproot and doesn’t appreciate repeated disturbance. |
| Lettuce | ⭐⭐⭐⭐☆ Good | Young lettuce is a better candidate than a mature head that’s already close to harvest. |
| Spinach | ⭐⭐⭐☆☆ Fair to Good | Move young plants during cooler conditions and handle the roots gently. |
| Tomatoes | ⭐⭐⭐⭐⭐ Excellent | Young tomato plants transplant well and can be planted deeper than they were growing in the hydroponic system. |
| Peppers | ⭐⭐⭐⭐⭐ Excellent | Young, healthy pepper plants generally transition well once outdoor temperatures are warm enough. |
| Cucumbers | ⭐⭐⭐☆☆ Fair | Cucumbers can be sensitive to root disturbance, so transplant them while young and handle the roots as little as possible. |
| Strawberries | ⭐⭐⭐⭐☆ Good | Healthy plants can be moved into containers or garden beds if the crown is positioned correctly. |
| Kale | ⭐⭐⭐⭐⭐ Excellent | A relatively hardy choice for moving from a hydroponic system into soil. |
| Swiss Chard | ⭐⭐⭐⭐⭐ Excellent | Young plants generally tolerate transplanting well. |
| Houseplants | ⭐⭐⭐☆☆ Varies | Many water-rooted houseplants can transition to potting mix, but care requirements depend on the species. |
Strawberries are only one option. If you’re interested in growing fruit without soil, see our guide to the Best Hydroponic Fruits for more crops to consider.
Plants That Usually Handle the Move Well
If you’re new to transferring hydroponic plants, herbs such as basil and mint are good places to start. Our guide to the Best Hydroponic Herbs covers more herbs you can grow in a soilless system. Tomatoes, peppers, kale, and Swiss chard are also relatively forgiving when they’re transplanted while young and healthy.
The important point isn’t simply which crop you’re growing. Plant age, root condition, temperature, soil moisture, and how gently you handle the roots can all affect the outcome.
Plants That Need Extra Care
Be more cautious with plants that dislike root disturbance or are already approaching the end of their growing cycle.
Cucumbers, for example, are better moved while they’re small rather than after they’ve developed long vines. Cilantro should also be transplanted young because of its taproot. Moving mature lettuce may not be worthwhile if it’s already close to harvest.
Root crops such as carrots and radishes are another special case. If the edible root is already developing, disturbing it during transplanting can affect its shape and growth. These crops are usually better left where they’re growing.
As a general rule, transplant hydroponic plants while they’re young, healthy, and actively growing rather than waiting until they’ve outgrown the system. You’ll have an easier time handling the roots, and the plant has more growing time ahead of it to adapt to its new environment.
When Is the Best Time to Transplant?
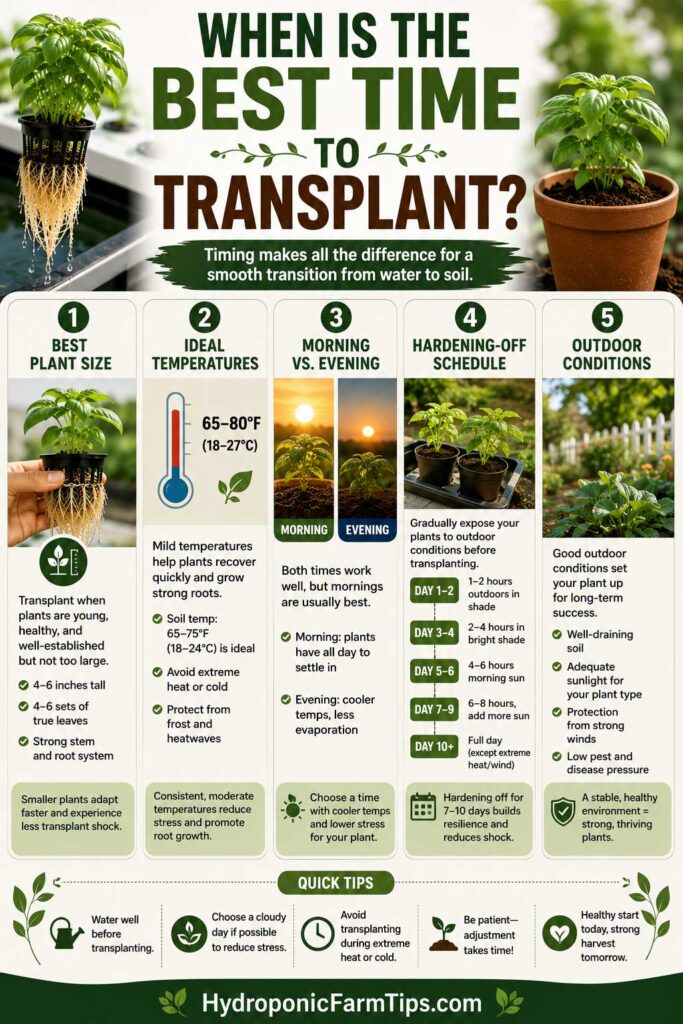
The best time to transplant hydroponic plants is while they’re healthy, actively growing, and still small enough that you can handle the roots without damaging them. If the plant is going outdoors, weather conditions matter just as much as its size.
Transplant While Plants Are Young
You don’t need to wait for a hydroponic plant to become large before moving it to soil. In fact, waiting too long can make the job harder, especially once roots become tangled with neighboring plants or equipment.
Look for a plant that has:
- Several true leaves
- Healthy new growth
- A well-developed but manageable root system
- White or light-colored roots without signs of rot
- A sturdy stem appropriate for the plant
Leafy greens and herbs are generally easier to move while they’re young. Tomatoes and peppers can be transplanted once they’re well established, while cucumbers are better moved before their roots and vines become difficult to handle.
Choose Mild Weather for Outdoor Transplants
Avoid moving a plant from a protected indoor hydroponic system directly into hot sun, strong wind, or unusually cold weather.
A cloudy or mild day is a good choice. You can also transplant in the morning or later in the afternoon when the sun is less intense.
Most importantly, check the temperature requirements of the specific crop you’re growing. Cool-season lettuce and kale tolerate very different conditions from warm-season tomatoes, peppers, and cucumbers.
For perennial plants being moved outdoors, you can also check your location on the USDA Plant Hardiness Zone Map. Keep in mind that hardiness zones are based on average annual extreme minimum winter temperatures, so they aren’t a substitute for checking current weather or the temperature needs of a particular crop.
Harden Off Hydroponic Plants Before Moving Outdoors
If your plants have been growing indoors under LED lights, they aren’t accustomed to direct sunlight, wind, or outdoor temperature swings. Gradually introducing them to those conditions before planting them outside permanently is known as hardening off.
The Royal Horticultural Society’s hardening-off guidance similarly recommends gradually acclimating protected plants to outdoor conditions before planting them out.
Here’s a simple example:
| Day | Outdoor Exposure |
|---|---|
| Days 1–2 | 1–2 hours in a sheltered, shaded location |
| Days 3–4 | 2–4 hours outdoors with some gentle morning sun |
| Days 5–6 | Several hours outdoors with gradually increasing sunlight |
| Day 7+ | Longer outdoor exposure as the plant adjusts |
This gradual approach isn’t just for hydroponics. Penn State Extension’s guidance on transplanting seedlings also recommends hardening off young plants before moving them from protected conditions into the garden.
This isn’t a strict schedule. If a plant starts wilting badly, develops scorched leaves, or the weather suddenly becomes hot, cold, or windy, slow the process down.
Also, don’t leave warm-season plants outside overnight until nighttime temperatures are suitable for that particular crop.
Affiliate disclosure: This article may contain affiliate links. If you purchase through one of these links, we may earn a commission at no additional cost to you.
Useful Supplies for Moving Hydroponic Plants Outdoors
Moving your plants outside? A few basic supplies can make hardening off and the first days in the garden easier, especially when sun, wind, and temperature fluctuate.
| Product | Why It’s Helpful | Best For | Where to Buy |
|---|---|---|---|
| Shade Cloth | Provides temporary protection during unusually intense sun | Outdoor transplants | Check Price on Amazon → |
| Garden Thermometer | Helps monitor outdoor growing conditions | Warm-season crops | Check Price on Amazon → |
| Fabric Grow Bags | Provide portable containers with good drainage | Tomatoes, peppers & herbs | Check Price on Amazon → |
| Organic Mulch | Helps reduce moisture loss from the soil surface | Beds & large containers | Check Price on Amazon → |
| Plant Supports | Supports taller plants as they establish outdoors | Tomatoes & peppers | Check Price on Amazon → |
Don’t Transplant an Already Stressed Plant
Moving from hydroponics to soil is stressful enough without adding another problem.
Delay the transplant if you notice:
- Severe wilting
- Unexplained yellowing
- Brown, slimy, or unhealthy roots
- Pest problems
- Disease symptoms
- Recent physical damage
If the plant is struggling before the move, check its nutrient strength and pH first. Our Hydroponic Nutrient and pH Chart lists recommended ranges for common herbs, vegetables, and fruiting crops.
Address the underlying problem first whenever possible. A healthy plant has a much better starting point for adapting to soil.
Keep the Roots Moist During the Move
Prepare your pot, garden bed, and planting hole before taking the plant out of the hydroponic system. This minimizes the amount of time its roots spend exposed to air.
Prepare your pot, garden bed, and planting hole before taking the plant out of the hydroponic system. Once the plant is removed, keep the roots moist and get them into the prepared soil without unnecessary delay.
For the easiest transition, choose a healthy young plant, wait for suitable outdoor conditions, harden it off when necessary, and have the soil ready before you touch the roots.
What You’ll Need
Have your soil, container, and tools ready before removing the plant from the hydroponic system. Hydroponic roots can dry quickly once they’re exposed to air, so you don’t want to be searching for a pot or digging a planting hole while the roots are sitting on the counter.
Fortunately, you don’t need much.
Hydroponic-to-Soil Transplanting Essentials
Getting ready to make the move? You don’t need a complicated transplanting kit. These basic supplies cover the essentials for moving hydroponic plants into containers or garden beds.
| Product | Why It’s Useful | Best For | Where to Buy |
|---|---|---|---|
| Quality Potting Mix | Provides drainage, moisture retention, and aeration | Container transplants | Check Price on Amazon → |
| Pots With Drainage Holes | Allows excess water to escape | Herbs, vegetables & houseplants | Check Price on Amazon → |
| Hand Trowel | Makes preparing planting holes easier | Pots & garden beds | Check Price on Amazon → |
| Gentle Watering Can | Waters newly planted roots without disturbing the soil | Small plants & containers | Check Price on Amazon → |
| Gardening Gloves | Makes handling soil and transplanting cleaner | General transplanting | Check Price on Amazon → |
Choose Loose, Well-Draining Soil
During the transition, the roots need a good balance of moisture and oxygen.
For containers, use a quality potting mix rather than digging soil directly from the garden. Potting mixes are formulated to provide the drainage and aeration container-grown roots need.
For a garden bed, the soil should be loose enough for roots to spread and should drain without remaining saturated for long periods. Compost or other organic matter can be incorporated when appropriate for your soil and crop.
The ideal soil pH depends on what you’re growing. Many common vegetables and herbs prefer slightly acidic to near-neutral conditions, but it’s better to follow the recommended range for the specific plant rather than trying to make every transplant fit one number.
Keep in mind that the target pH may change when you move from a nutrient solution into soil. If you’re still growing other plants hydroponically, see What Is the Best pH for Hydroponics? for more on managing pH in your system.
Prepare the Planting Hole Before Removing the Plant
Dig the hole first.
Make it wide enough to accommodate the root system without forcing the roots into a tight bundle. You don’t need to straighten every individual root, but they should fit comfortably without being crushed or sharply bent.
If you’re using a container, add your potting mix and make the planting hole before taking the plant out of the hydroponic system.
This way, the roots can go almost directly from their moist hydroponic environment into the prepared soil.
Moisten the Soil
If the potting mix or garden soil is dry, moisten it before planting. You want it evenly damp, not saturated.
Dry soil can pull moisture away from exposed roots, while completely waterlogged soil leaves fewer air spaces around them.
Once the plant is in place, you’ll water again to settle the soil around the roots.
Do You Need a Root Booster?
Usually, no.
A healthy plant, suitable soil, careful handling, and proper watering are more important than adding a transplant fertilizer or root-stimulating product.
In fact, avoid giving freshly transplanted roots a strong dose of fertilizer simply because the plant was previously growing in a nutrient solution. Give the plant time to settle into its new environment first, especially if you’re using a potting mix or amended soil that already contains nutrients.
When moving a plant from hydroponics to soil, keep things simple: prepare the soil beforehand, protect the roots from drying out, plant gently, and pay close attention to moisture while the plant adjusts.
Step-by-Step Guide to Transfer Plants from Hydroponics to Soil
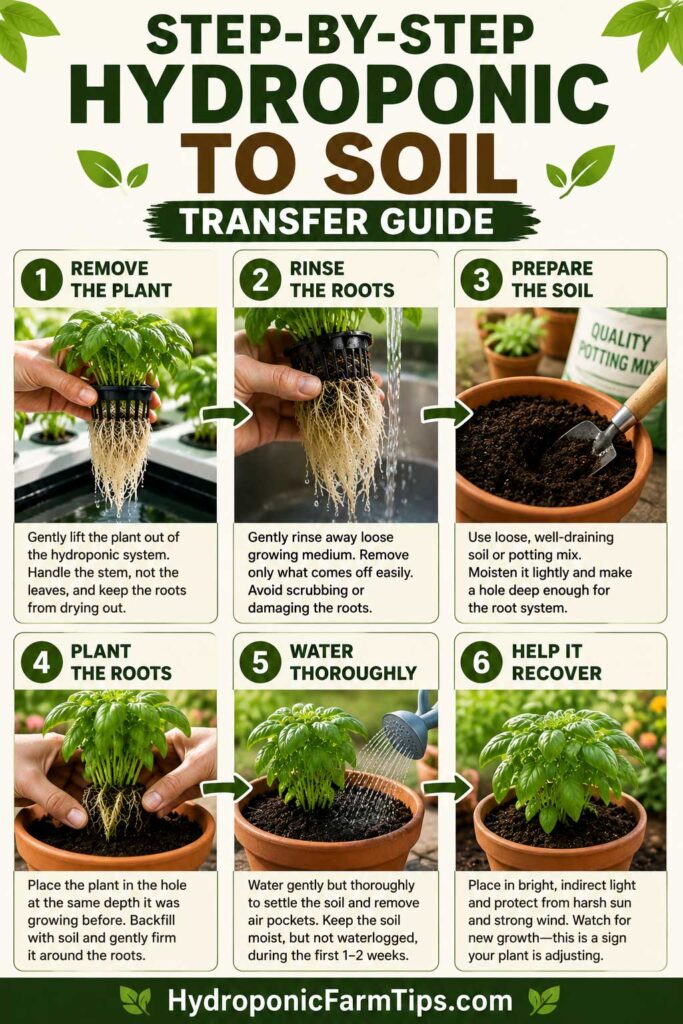
Once your soil and planting area are ready, you can begin the actual transfer. Work gently and avoid leaving the roots exposed any longer than necessary.
Here’s how to transfer plants from hydroponics to soil step by step.
Step 1: Choose a Healthy Plant
Start with a plant that’s actively growing and shows no obvious signs of disease or severe stress.
Look for:
- Healthy new growth
- Firm stems
- White or light-colored roots
- No slimy, foul-smelling, or badly damaged roots
- No serious pest or disease problems
A few stained or darker roots don’t automatically mean something is wrong—some hydroponic nutrients and growing media can discolor roots. Texture, smell, and the overall health of the plant matter too.
Step 2: Prepare the Soil and Planting Hole
Do this before removing the plant from your hydroponic system.
For containers, use a loose, well-draining potting mix and a pot with drainage holes. For garden beds, make sure the soil drains adequately and is suitable for the crop you’re transplanting.
Moisten dry soil beforehand and make a hole large enough to comfortably accommodate the roots.
Step 3: Remove the Plant From the Hydroponic System
Carefully lift the plant from the system while supporting it near the base.
Depending on your setup, you may need to remove a net pot, separate a few tangled roots, or gently work clay pebbles away from the root system.
Take your time. Don’t tug on the stem or force tangled roots apart. A few fine roots may break during the process, especially if they’re tangled, but try to preserve as much of the healthy root system as possible.
Step 4: Remove Only Loose Growing Medium
You don’t need perfectly clean, bare roots before planting.
Loose clay pebbles or pieces of growing medium that fall away easily can be removed. If necessary, gently rinse loose material away with clean water.
However, don’t tear roots apart just to remove every trace of rockwool, coco coir, or another medium.
If roots have grown throughout a rockwool cube or starter plug, it’s usually better to transplant the plant with the plug still attached rather than damaging the root system trying to remove it.
Step 5: Position the Roots in the Soil
Lower the plant into the prepared hole and allow the roots to sit as naturally as possible. Avoid stuffing a large root mass into a tiny hole or sharply folding long roots upward.
For most plants, use the normal planting depth recommended for that species.
Tomatoes are an exception. Healthy tomato seedlings can generally be planted deeper because buried portions of the stem can develop adventitious roots.
Don’t automatically bury the stems or crowns of other crops—strawberry crowns, for example, need proper positioning and shouldn’t simply be covered with soil.
Step 6: Fill Around the Roots
Gently add soil around the root system until the planting hole is filled.
Use your fingers to settle the soil around the roots, but don’t pack it down hard. The goal is good root-to-soil contact while preserving the air spaces needed for drainage and oxygen.
Step 7: Water Immediately
Water the plant thoroughly after planting.
This helps settle the soil around the roots and closes larger air gaps left during transplanting. Allow excess water to drain away rather than leaving the container or planting area waterlogged.
During the early transition, aim for consistently moist rather than constantly saturated soil.
Step 8: Protect the Plant After the Move
If you’ve already hardened off an outdoor plant, continue protecting it from unusually harsh conditions immediately after transplanting.
If it’s going outside, avoid choosing a hot, windy afternoon for the move. Temporary protection from intense sun may help if conditions are stressful.
For indoor plants, place them in light appropriate for the species rather than immediately changing several growing conditions at once.
Step 9: Watch the Plant Closely
Check the plant regularly during the first several days.
A little drooping or a temporary pause in growth can happen after transplanting. Look for the plant to gradually stabilize and resume healthy growth.
Pay closer attention if you notice:
- Wilting that continues to worsen
- Rapidly spreading yellowing
- Soft or collapsing stems
- Persistently soggy soil
- Brown, black, or mushy roots
- A foul smell around the root zone
Those symptoms may point to excessive moisture, poor drainage, damaged roots, disease, or another problem that needs attention.
Step 10: Gradually Return to Normal Care
Once the plant begins producing healthy new growth, you can treat it more like an established soil-grown plant.
Adjust watering according to the crop, container size, weather, and how quickly the soil dries rather than following a fixed schedule.
Don’t rush to add fertilizer. If your potting mix or garden soil already contains nutrients, additional feeding may not be necessary right away. Start fertilizing when appropriate for the plant and growing medium you’re using.
Quick Hydroponics-to-Soil Checklist
Before you finish, make sure you’ve covered the essentials:
- ✔ Choose a healthy, actively growing plant.
- ✔ Prepare the soil before exposing the roots.
- ✔ Keep roots moist during the transfer.
- ✔ Handle tangled roots gently.
- ✔ Don’t strip away an established starter plug just to expose bare roots.
- ✔ Use loose soil or potting mix with good drainage.
- ✔ Water immediately after planting.
- ✔ Protect outdoor transplants from harsh conditions.
- ✔ Keep the soil moist without keeping it waterlogged.
- ✔ Watch for healthy new growth before returning to normal care.
Pay especially close attention immediately after transplanting, but let the plant’s condition—not the calendar—guide your care.
Does Moving a Hydroponic Plant to Soil Cause Transplant Shock?
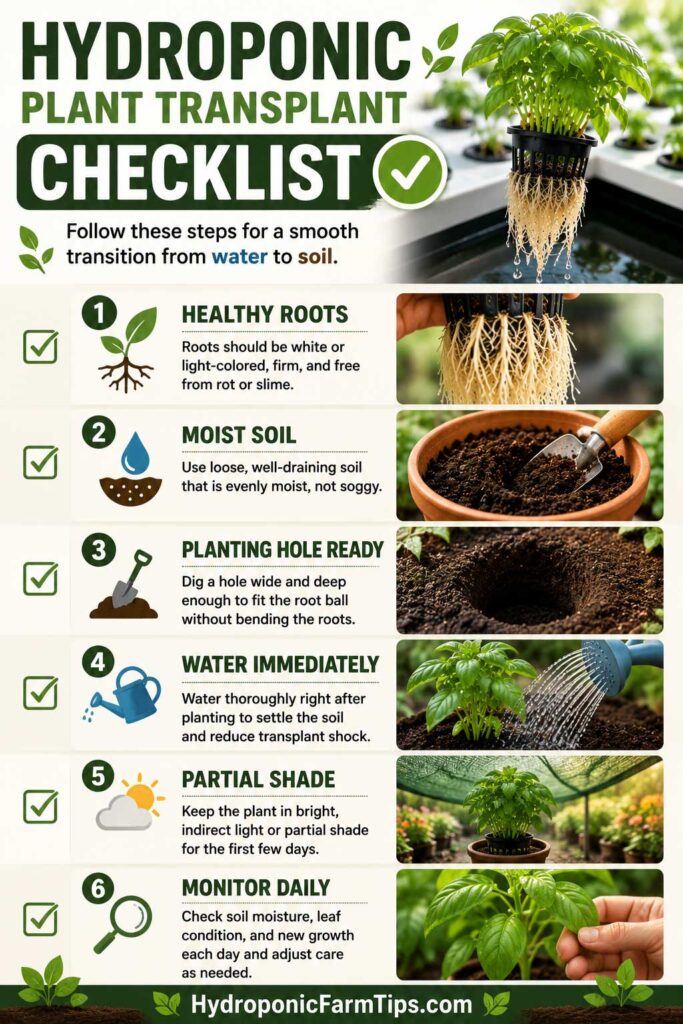
It can. Moving from hydroponics into soil changes the root environment, and an outdoor transplant may also have to cope with stronger sunlight, wind, and changing temperatures.
A little temporary stress doesn’t necessarily mean the transplant has failed. You may notice some drooping, slower growth, or changes in older leaves while the plant adjusts.
The best way to limit that stress is to handle the roots gently, prevent them from drying out, water the plant after transplanting, and avoid making several other changes at the same time.
If the plant wilts, check the soil before automatically adding more water or nutrients. Wilting can happen when soil is too dry, but damaged roots or waterlogged conditions can cause it too.
Don’t judge success by the calendar. Healthy new leaves or shoots and improving plant vigor are much better signs that the roots are establishing in soil.
Caring for Plants After Transplanting
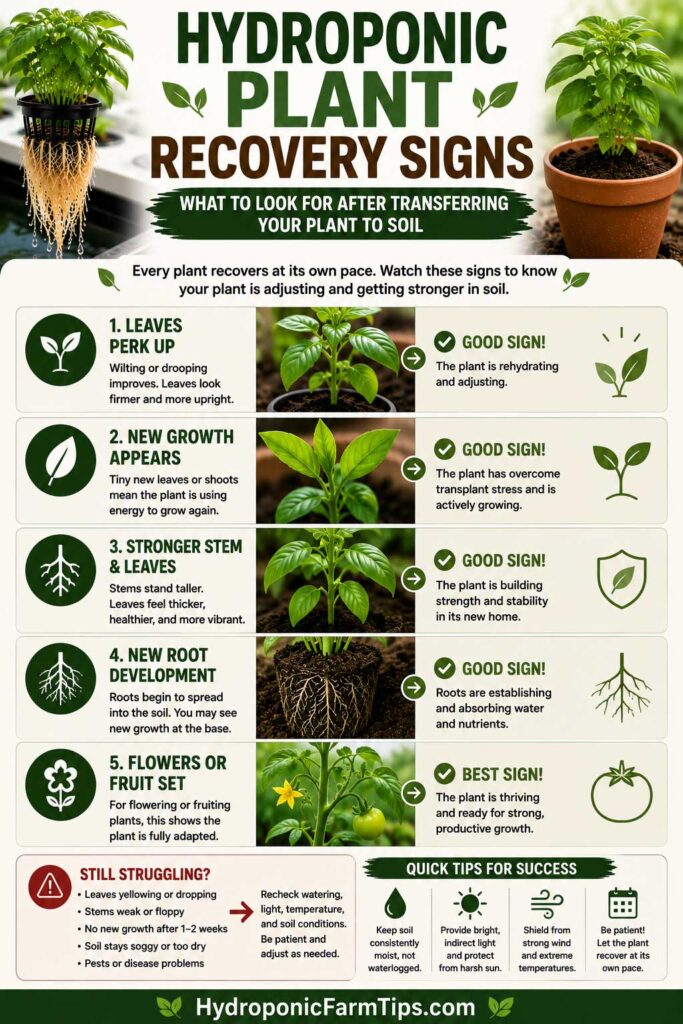
Once the plant is in soil, your job is mostly to keep conditions stable while the roots adjust. This isn’t the time for heavy feeding, repeated repotting, or constantly changing the plant’s environment.
Pay particular attention to soil moisture, drainage, light, and new growth during the early adjustment period.
Keep the Soil Moist, Not Soggy
Freshly transplanted hydroponic roots are accustomed to reliable access to water, so allowing the soil to become bone-dry immediately after transplanting can put additional stress on the plant.
At the same time, don’t compensate by keeping the soil saturated.
Check the soil regularly and water according to how quickly it dries. How often that happens will depend on the plant, weather, container size, soil mix, and whether it’s growing indoors or outside.
A few simple rules help:
- Keep the root zone evenly moist during the initial transition.
- Make sure containers have drainage holes.
- Don’t leave pots standing in water.
- Avoid letting the soil swing repeatedly between extremely dry and waterlogged.
- As new growth appears, gradually follow the normal watering needs of that particular plant.
Helpful Tools for Transplant Aftercare
Worried about getting the watering right? You don’t need to keep newly transplanted plants soaking wet. These simple tools can make it easier to manage moisture while the roots adjust to soil.
| Product | How It Helps | Best For | Where to Buy |
|---|---|---|---|
| Soil Moisture Meter | Provides another way to check moisture below the surface | Beginners & container plants | Check Price on Amazon → |
| Watering Can With Fine Rose | Delivers a gentler flow around newly planted roots | Pots & seedlings | Check Price on Amazon → |
| Organic Mulch | Helps slow moisture loss from outdoor soil | Raised beds & gardens | Check Price on Amazon → |
| Drip Irrigation Kit | Makes consistent outdoor watering easier | Multiple plants & raised beds | Check Price on Amazon → |
| Plant Labels | Helps track varieties and transplant dates | Larger gardens | Check Price on Amazon → |
Protect Outdoor Plants From Harsh Conditions
If you hardened off your hydroponic plants before transplanting, they should already be accustomed to increasing amounts of outdoor light and wind.
Even so, try to avoid transplanting immediately before extreme heat, strong winds, or other stressful weather.
If a newly transplanted plant wilts badly in intense afternoon sun, temporary protection can help while it settles in. Don’t automatically leave a sun-loving crop in deep shade for a week, though. The goal is to reduce excessive stress, not deprive it of the light it normally needs.
Indoor plants should likewise receive light appropriate for their species.
Don’t Rush to Fertilize
More nutrients don’t necessarily mean faster recovery.
Many commercial potting mixes already contain fertilizer, and amended garden soil may provide adequate nutrients as well. Adding a strong fertilizer immediately after transplanting can be unnecessary and, depending on the product and concentration, may damage sensitive roots.
Instead, check what your growing medium already contains and watch the plant.
Once it has settled in and resumed active growth, begin an appropriate feeding routine if the crop and soil require it.
Watch How the Plant Responds
Some plants barely react to the move, while others may temporarily droop or slow their growth.
Possible signs of transplant stress include:
- Wilting or drooping
- A temporary pause in growth
- Some yellowing of older leaves
- Minor leaf loss
A drooping leaf isn’t necessarily a reason to intervene. Check the soil moisture, weather conditions, and overall plant before adding more water or fertilizer.
What matters most is whether the plant begins to stabilize and produce healthy new growth.
Know the Warning Signs
Stress that becomes progressively worse deserves closer attention.
Look for:
- Severe or persistent wilting
- Rapidly spreading yellowing
- Soft or collapsing stems
- Soil that stays saturated for long periods
- Brown, black, or mushy roots
- An unpleasant smell from the root zone
These symptoms can have several causes, including poor drainage, excessive watering, damaged roots, disease, or environmental stress.
If the soil is constantly wet, don’t automatically add more water because the leaves are wilting. Wilting can occur when roots are struggling in waterlogged soil too.
Avoid Unnecessary Disturbance
Once you’ve completed the hydroponic transplant, give the plant a chance to settle.
Unless there’s a problem that requires intervention, avoid:
- Repotting it again
- Pulling it out to inspect the roots
- Heavy pruning
- Applying strong fertilizer
- Constantly moving it between different environments
- Allowing the root zone to become extremely dry or saturated
Consistent conditions make it easier to tell whether the plant is actually improving.
Signs the Plant Is Adapting to Soil
Rather than counting a specific number of days, watch the plant itself.
Good signs include:
- Fresh new leaves or shoots
- Firm, upright growth
- Healthy leaf color
- Continued stem or vine development
- No worsening signs of transplant stress
Different plants establish at different rates, and temperature, light, root damage, plant maturity, and growing conditions can all affect recovery.
Healthy new growth is one of your best indicators that the transfer has worked. Once you see it, gradually shift from special transplant care to the normal watering, light, and feeding routine recommended for that plant.
Common Mistakes When Transferring Hydroponic Plants to Soil
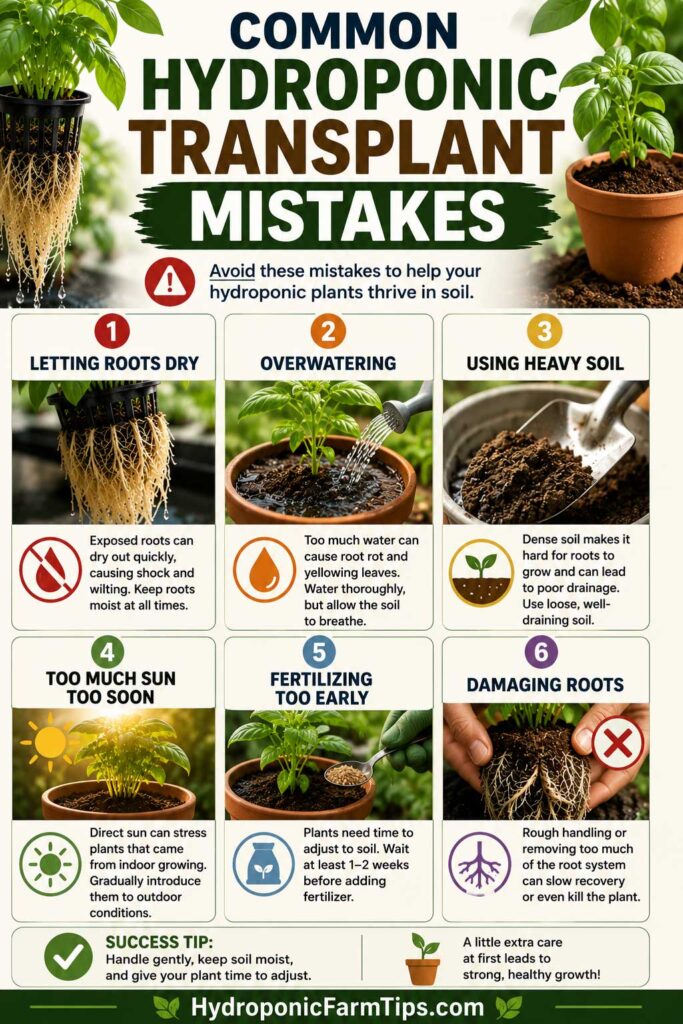
Most problems that occur after transferring hydroponic plants aren’t caused by the switch to soil itself. They’re more often related to damaged roots, poor drainage, watering mistakes, or changing the plant’s environment too quickly.
Here are the mistakes to watch for.
1. Letting Exposed Roots Dry Out
Hydroponic roots are accustomed to a consistently moist environment and can dry quickly once removed from the system.
Prepare your container or planting hole first, then remove the plant. If you can’t plant immediately, keep the roots moist and protected from direct sun and drying wind.
2. Trying to Remove Every Bit of Growing Medium
You don’t need perfectly clean, bare roots.
Remove loose clay pebbles or other material that comes away easily, but don’t pull apart an established root system just to remove rockwool, coco coir, or a starter plug.
If roots have grown through the material, protecting the roots is more important than removing the medium.
3. Using Dense or Poorly Draining Soil
Hydroponic roots still need oxygen after they’re planted.
For containers, use a potting mix designed to provide both drainage and moisture retention. In garden beds, avoid planting into badly compacted or persistently waterlogged soil.
Good drainage becomes especially important while the roots are adjusting.
4. Keeping the Soil Too Wet
This is one of the easiest mistakes to make.
A plant that came from hydroponics doesn’t need to sit in saturated soil. Waterlogged soil contains fewer air-filled pores, which can interfere with healthy root function and create conditions favorable to root problems.
Keep the soil moist, not constantly soaked.
And remember: a wilting plant doesn’t always need more water. Check the soil before reaching for the watering can.
5. Changing the Environment Too Quickly
Moving an indoor-grown plant directly into intense outdoor sunlight and wind adds another layer of stress to the transplant.
If the plant is going outdoors, harden it off first. After transplanting, protect it from unusually harsh conditions while continuing to provide the amount of light appropriate for that crop.
Don’t automatically keep sun-loving vegetables in deep shade for several days.
6. Fertilizing Because the Plant Looks Stressed
Drooping after transplanting doesn’t necessarily mean the plant needs nutrients.
Check the moisture level, drainage, temperature, and existing fertilizer in your potting mix before adding anything. Strong or unnecessary fertilizer can create another problem while the roots are adjusting.
Wait until feeding is actually appropriate for the plant and growing medium you’re using.
7. Handling the Roots Too Aggressively
Trying to straighten every root, ripping apart tangled roots, or scrubbing away growing media can cause unnecessary damage.
Some root disturbance may be unavoidable, especially in a crowded hydroponic system. Work slowly and preserve as much healthy root tissue as you reasonably can.
8. Waiting Until the Plant Is Difficult to Move
A huge plant isn’t necessarily a better transplant candidate.
Plants with long vines, heavy fruit, or roots tangled throughout a hydroponic system can be much harder to remove without damage. Whenever practical, transplant hydroponic plants while they’re young, healthy, and manageable.
9. Reacting Too Quickly to Transplant Shock
A little drooping or temporarily slower growth doesn’t automatically mean the transplant has failed.
Avoid responding to mild transplant stress by repeatedly watering, fertilizing, moving, pruning, or digging around the roots. Too many interventions can make it harder for the plant to settle in.
Instead, keep conditions stable and watch whether the plant begins to recover.
Investigate if you see worsening symptoms such as:
- Persistent or severe wilting
- Rapidly spreading yellowing
- Soft or collapsing stems
- Persistently waterlogged soil
- Mushy or foul-smelling roots
Quick Mistake Checklist
Before you make the move, check these seven things:
| Check | Ready? |
|---|---|
| Plant is healthy and actively growing | ✔ |
| Soil or potting mix drains well | ✔ |
| Planting hole is already prepared | ✔ |
| Roots won’t be left exposed to dry out | ✔ |
| Established starter plugs won’t be forcibly removed | ✔ |
| Outdoor plants have been properly hardened off | ✔ |
| You have a plan to keep the soil moist without saturating it | ✔ |
The biggest mistake is trying to overmanage the transition. Prepare everything beforehand, handle the roots gently, maintain suitable moisture and light, and give the plant time to show you how it’s responding.
FAQs About Transferring Plants from Hydroponics to Soil
Can hydroponic plants survive in soil?
Yes. Many healthy hydroponic plants can adapt to soil when they’re transplanted carefully. Keep the roots from drying out during the move, use soil or potting mix with good drainage, and pay close attention to moisture while the plant becomes established.
Younger, actively growing plants are generally easier to move than large plants with tangled roots, flowers, or heavy fruit.
Do hydroponic roots change after being planted in soil?
Yes. Roots respond to the environment in which they’re growing. After moving from a hydroponic system into soil, the existing roots must adjust to different levels of moisture, oxygen, nutrients, and physical resistance.
The plant can also produce new roots that develop under these soil conditions. Some older roots may decline during the transition, while healthy new root growth supports the plant as it becomes established.
Should I wash hydroponic roots before planting them in soil?
Usually, you don’t need to wash the roots completely clean.
Remove loose clay pebbles or growing medium that comes away without disturbing the roots. A gentle rinse can help remove loose material when necessary, but avoid scrubbing the roots or pulling them apart.
If roots have grown through rockwool or another starter plug, it’s generally better to leave the plug attached than tear healthy roots trying to remove it.
How long does transplant shock last?
There’s no single recovery time for every plant.
Some plants show little noticeable stress, while others may droop or temporarily stop growing after being moved. Plant species, maturity, root damage, temperature, light, soil moisture, and outdoor conditions can all affect recovery.
Rather than counting days, watch for healthy new growth and improving plant vigor. Those are better indicators that the plant is becoming established.
Can I transfer mature hydroponic plants to soil?
Yes, but it can be more difficult.
Large plants may have extensive roots tangled around net pots, tubing, neighboring plants, or other parts of the hydroponic system. Fruiting plants also have greater water and structural demands.
When you have a choice, it’s usually easier to transplant hydroponic plants while they’re young, healthy, and manageable.
Which plants are easiest to move from hydroponics to soil?
Basil, mint, tomatoes, peppers, kale, and Swiss chard generally handle transplanting reasonably well when they’re healthy and moved at a manageable size.
Young lettuce, parsley, strawberries, and many houseplants can also make the transition. Plants that dislike root disturbance, such as cucumbers and cilantro, require more careful handling.
The condition and maturity of the plant can be just as important as the species.
How often should I water after transplanting?
Water thoroughly immediately after planting, then check the soil regularly rather than following a fixed schedule.
During the initial transition, aim to keep the root zone evenly moist without leaving it saturated. How quickly the soil dries depends on factors such as temperature, sunlight, container size, soil type, plant size, and weather.
As the plant becomes established, transition to the normal watering routine recommended for that crop.
Can I use garden soil instead of potting mix?
If you’re planting directly into a garden bed, yes, provided the soil is suitable for the plant and drains adequately.
For containers, use a potting mix rather than ordinary garden soil. Container mixes are designed to maintain a better balance of moisture, drainage, and air space within the limited volume of a pot.
Can I transfer hydroponic lettuce to soil?
Yes, especially when the lettuce is still young. Handle the roots gently, keep the soil evenly moist during the transition, and avoid moving an indoor-grown plant directly into harsh outdoor conditions.
If the lettuce is already mature and nearly ready to harvest, however, transplanting it may offer little benefit.
Can I transfer hydroponic herbs to soil?
Yes. Basil, mint, parsley, chives, and several other herbs can be moved from hydroponics to soil.
For the easiest transition, move them while they’re actively growing and before their roots become heavily tangled in the system. If they’re going outdoors, harden them off first.
Houseplants can make the transition too. If you’re growing plants such as pothos, philodendron, peace lily, or other indoor species in water, browse our Best Hydroponic House Plants for more ideas.
Will a transplanted hydroponic plant continue growing normally?
It can. Once a plant becomes established in soil, it can continue producing leaves, flowers, or fruit according to its normal growth cycle.
Its eventual performance will depend on the same factors that affect other soil-grown plants, including light, temperature, water, nutrients, root space, pests, and the condition of the soil.
Ready to Move Your Hydroponic Plants to Soil?
Learning how to transfer plants from hydroponics to soil mostly comes down to protecting the roots and avoiding too many changes at once.
Prepare the soil before removing the plant, keep exposed roots moist, handle them gently, and don’t try to strip away an established starter plug. After planting, keep the soil moist but not waterlogged and watch the plant rather than relying on a rigid watering or recovery schedule.
Most importantly, don’t panic if the plant droops a little after the move. Give it stable conditions and look for healthy new growth. That’s one of the clearest signs that your hydroponic plant is settling into its new home in soil.